The GL Accounting method provides users with a way to interact with Quickbooks Desktop or other Accounting Systems without the need to sync transaction level data with an integration. The GL Report within Tai serves as the source for summarized A/R and A/P data which can then be entered as Journal Entries into your accounting system.
Accounts Payable
For the GL Accounting Method, we will be pushing Expense/ COGS data from the TMS into your Accounting System. To pull AP data from Tai for all expenses, you will need to navigate to the GL Report located under the Accounting Tab. The GL Report summarizes transactions for a given period, making it easy to populate Journal Entries in your accounting system. For more information on the GL report, please refer to this link.
The GL Report will be populated with summarized TMS transactions broken out into your various GL Accounts. These lines neatly form the basis of the Journal entry which we can add later into Quickbooks.
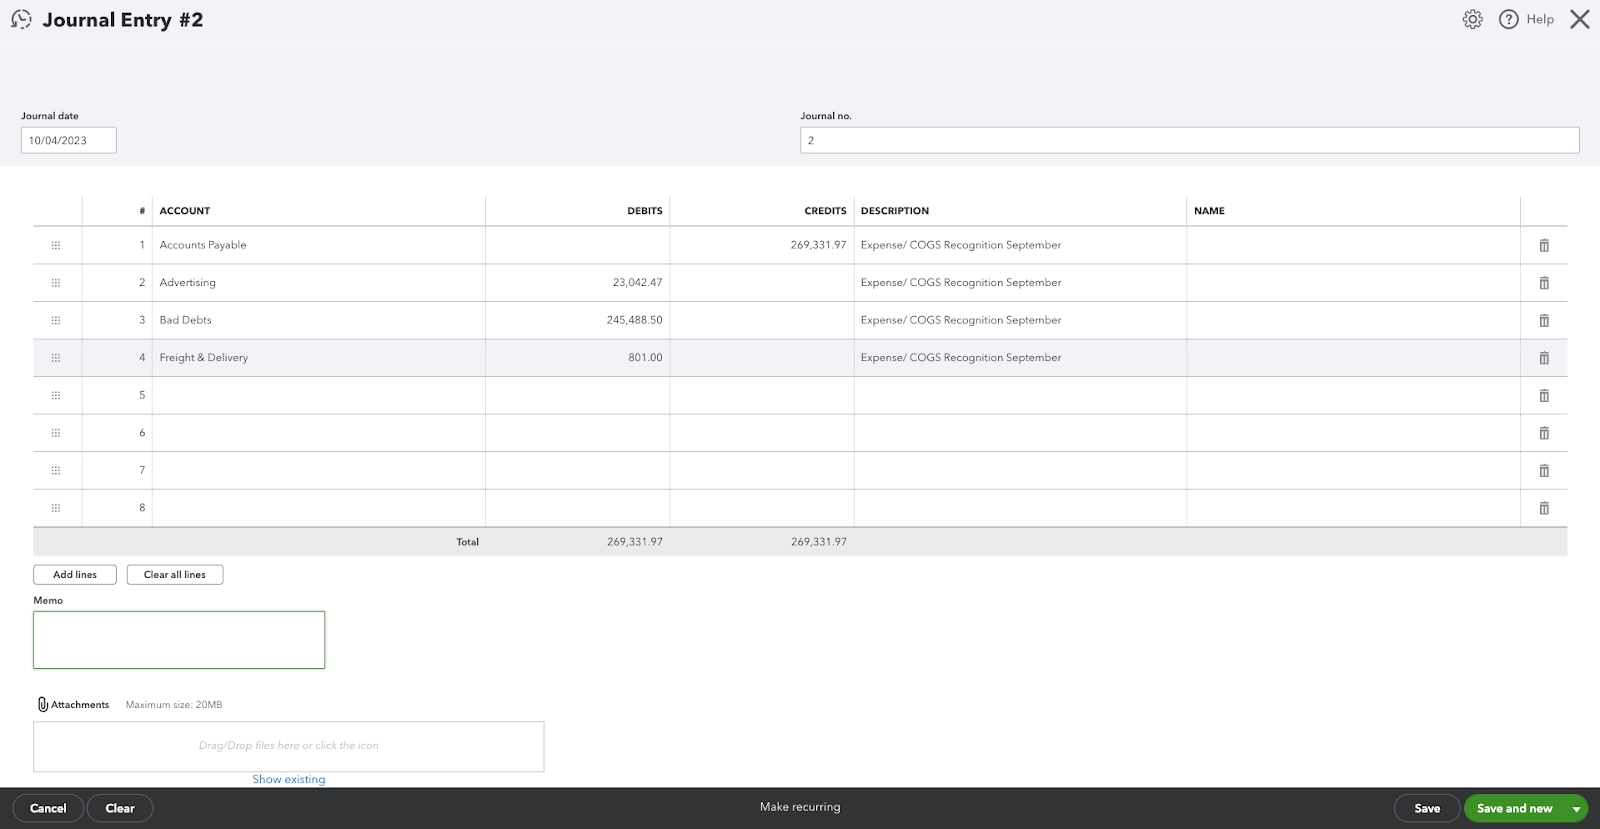
The Journal Entry in Quickbooks can be built out with the above data similar to the example below (Note this will differ based on your chart of accounts). The Total Expenses will credit Accounts Payable and then the various expense accounts will be entered as debits. To configure specific GL Accounts on your GL Report, please see the Account Tabs section on the GL Report article.

Syncing Vendor Data to Quickbooks Desktop
In order to ensure payments are processed correctly, a list of Vendors can be exported from the TMS and imported into Quickbooks or your accounting system. Vendor data can be exported using the Custom Report builder at a regular cadence and uploaded into your accounting system. We recommend that this is done prior to making payments. Tai recommends SaasANT for this process if using Quickbooks Desktop.
Making Payments
Vendor payments (check runs) must be processed outside of the TMS in an accounting system. Separating check runs from the TMS will help ensure the security of your checks. To ensure that these are processed accurately and also include all of the information in the TMS, we can use the Pay Bills page. Pay Bills will allow us to create the Payments using the Print Check Later option. We can then enter these payments into Quickbooks to process them from there. To ensure accuracy, Vendor data can be uploaded prior to your check run, however, it is not required.
The Payment History page can be used to produce an export file of pending payments which can then be loaded into your accounting system to complete your check run. For importing CSV files of Payment data, Tai recommends SaasANT for QuickBooks Desktop.
Note, Tai integrates with various AP processing tools to streamline and automate this process further. These include Triumph Pay and EPay manager and the Tai Document Processor. This will allow approved bills to be automatically processed. For more information on these tools, please refer to our Knowledge Base articles on each.
Entering Check Numbers
Following a check run, the Assign Check Numbers page can be used to enter check references for the corresponding payments back into Tai. For more information on this page, please refer to the Knowledge Base article.
Sending Payment Remittances
Remittances can be sent directly out of the TMS on the Bill Payment History page for all checks paid out of your accounting system. The export remittances option on the Payment History page will produce a csv file of remittance data. Clicking into the number of bills associated with the payment will allow for the remittances to be directly sent to the vendor contact on file.
Accounts Receivable
For Accounts Receivable, we will be pushing our revenue data to our Accounting System as Journal Entries from the TMS. This will include our Accounts Receivable revenue recognition totals along with information from our various income accounts.
The GL Report will be populated with summarized TMS transactions broken out into your various GL Accounts for A/R. These lines neatly form the basis of a Journal entry which we can add into Quickbooks.
To build our Journal Entry in Quickbooks, we can use the lines from GL report similar to the below (Note this will differ based on your chart of accounts). The Total Revenue will debit our Accounts Receivable and then our various income accounts will be entered as credits. To configure specific GL Accounts on your GL Report, please see the Account Tabs section on the GL Report article.


Also listed in this example is our Daily Deposit information. This represents the total amount that is deposited into our bank from checks/ payments processed in the given period. We would typically create a separate journal entry for this amount based on our deposits. This will debit our Bank Account and credit our Accounts Receivable.
Supplementary Transaction Data
Once our Journal Entries are entered, we can save supplementary transaction data to corroborate each Journal Entry. To grab this supplementary data, we will want to use the Custom Report builder to export TMS transactions for the same period as the Journal Entry referenced above. Please note, that we will want to filter on the transaction dates that are automatically assigned to each transaction (called Invoice sync date and bill sync date). This should be configured by your onboarding representative to work properly, specifically, the accounting sync setting on your LSP profile MUST be setup correctly. The report scheduler feature will ensure that this automatically occurs and can be saved along with the journal entry or in a separate folder that can be sent to your accountants. Note that in some versions of quickbooks, the supplementary transactions data can be saved directly on the Journal Entry. We recommend using a file manager like Drive or Dropbox.
Our recommended list of fields for these reports is available below. Note that the sync dates from the GL Report and the transaction report must match in order to be utilized for this process. Note, these reports can also be used to import transactional data into your accounting system.
AP - Billing Report
- Shipment ID
- Shipment Type
- Service Level
- Status
- Accessorial List
- Commodity Descriptions
- Bill Number
- Bill Date
- Bill Due Date
- Bill Amount
- Bill Vendor Name
- Customer Name
- Buy Total
- Buy Freight
- Buy FSC
- Buy Accessorial
- Buy Other Charges
- Buy Taxes & Duties
- Buy Insurance
- Bill Vendor Street Address
- Bill Vendor Street Address Two
- Bill Vendor City
- Bill Vendor State
- Bill Vendor Zip Code
- Bill Sync Date* - Set To Transaction Dates from GL Repor
AR - Invoice Report
- Invoice Date
- Accessorial List
- Customer Name
- Customer PO Number
- Shipper Reference Number
- Shipment ID
- Shipment Type
- Status
- Sell Freight
- Sell FSC
- Sell Other Charges
- Sell Taxes & Duties
- Sell Insurance
- Sell Accessorial
- Sell Total
- Customer Payment Terms
- Customer Invoice Street Address
- Customer Invoice Street Address Two
- Customer Invoice City
- Customer Invoice State
- Customer Invoice Zip Code
- Invoice Due Date
- Invoice Amount
- Invoice Number
- Commodity Descriptions
- Service Level
- Invoice Sync Date - Set To Transaction Dates from GL Report
- Pickup Date
- Invoice Notes
Managing 1099s
To view 1099s, create a Custom Report (Carrier Type) w/ the 1099 required flag set, then use the Last Shipment Date and then run it for the year to date.
Values
- LSP Carrier ID
- Name
- SCAC
- Motor Carrier Number
- DOT Number
- 1099 Required - Set to True
- Last Shipment Date - Set to Year to Date