The Company Profile serves as a central resource for brokers to view and manage all customer details within the system, including (but not limited to) the following:
Create Shipments
You can create shipments directly from the Customer Company Profile. This will take you to the shipment details page, automatically filling out the customer information.
Edit your customer (Edit Record)
The Edit Record button allows you to update general customer information, such as:
-
Company name.
-
Office.
-
Addresses.
-
Contact information.
-
Invoice delivery email.
-
Customer portal settings.
-
Customer Notes: You can view or edit customer notes when editing a customer. Please note that these notes are visible only to Back Office users (LSP staff) and are not visible to the customer.
-
Inactivate Customers: Customers cannot be deleted, but you can easily inactivate them by:
-
Pull up the customer and click Edit Record.
-
Scroll to Customer Portal Settings and change the status from Active to Inactive.
-
Important: If you are configuring recipients for Internal Alert email templates, ensure that only internal staff email addresses are included. These alerts may contain sensitive operational or financial information (such as shipment margins). Adding a customer or external contact as an Internal Alert recipient may expose confidential information.

Accounting Profile
In the Accounting Profile section, you can edit details such as:
-
Tax number.
-
Credit status.
-
Credit limit.
-
Credit card processing fee percentage.
-
Payment terms.
-
And more.
Click HERE to view the Accounting Profile article.
Customer Tools
This section provides brokers access to the company’s address book, activity log, and other valuable tools.

Product Catalog
The Product Catalog allows customers and brokers to manage commonly used commodities for faster shipment creation. Brokers can:
-
Add individual products.
-
Import products in bulk.
-
Edit, delete, and export product details.
Click HERE to view the Product Catalog article.
Address Book
The Address Book enables efficient management of shipment locations. Brokers can:
-
Add or import addresses in bulk.
-
Edit or delete addresses in bulk.
-
Export address details.
During shipment creation, addresses can be searched by name or zip code. Accessorials can also be included for automatic application.
Click HERE to view the Address Book article.
Mileage Override
Use the Customer Mileage Override feature to upload custom mileage values for specific customer lanes. This bypasses standard PC Miler calculations and ensures rating accuracy when pre-negotiated or fixed mileage is required.
Click HERE to view the Mileage Override article.
Link Tariffs
Quickly view, edit, add, or remove tariff links to your selected customer. Margins can also be modified or created in this section.
Carrier Rules
The Carrier Rules Engine allows brokers to define and enforce carrier rules. These can be applied at the customer, sub-organization, or organization-wide level based on:
-
Carrier labels
-
Insurance coverage
-
Regions
-
Tariff restrictions
-
Documentation status
Configured rules ensure only compliant carriers are visible during shipment creation, quoting, and carrier searches (manual, automated, or API).

Click HERE to view the Carrier Rules article.
Reference Numbers
Customize and manage shipment reference numbers (e.g., PO Numbers, PRO Numbers) at the customer or organization level.
-
Set numbers as required or optional.
-
Show them in the Customer Portal or Back Office.
-
Configure for free-form entry or dropdown selections.
Click HERE to view the Shipment Reference Numbers article.
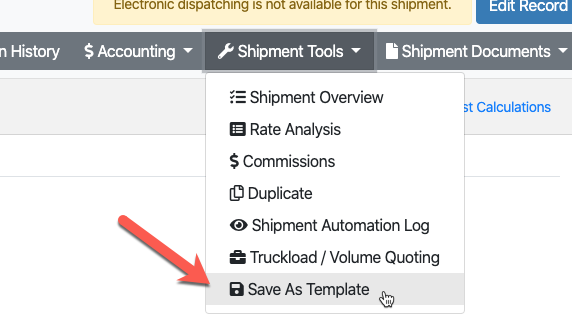
Shipment Templates
Shipment templates allow brokers to quickly create shipments with repeated information.
How to Create:
-
Pull up the shipment you want to save and go to Shipment Tools > Save as Template.
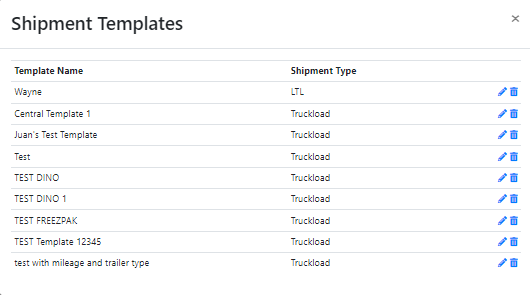
-
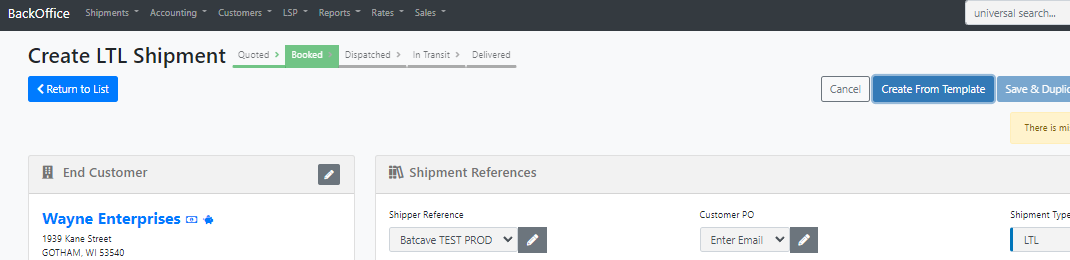
Once it is saved, edit or delete saved templates under Customer Company > Customer Tools > Shipment Template.
-
To use a template, click Shipments > Create a new shipment > Select customer > Create from Template.
Margins
-
Margin Search: Quickly filter linked margins for your selected customer. You can also switch between customer, tariff, or pricing plan margins.
-
Margin Create
Easily create and link margins using methods like:
-
-
CWT.
-
Flat.
-
Pieces.
-
Markup%.
-
Margin%.
-
Margins can also be applied to accessorials and given effective date ranges.
Click HERE to view the Margin Management article.
Customer Activity
View a time-stamped audit trail of all changes made to a customer’s profile, including:
-
Margin updates
-
Carrier rules
-
API integrations
-
Invoice automation settings
-
Account details
This section supports filtering by activity type and date range for better tracking and troubleshooting.
Usage Log
Track how each customer contact interacts with the Customer Portal. This includes logins, rate requests, shipment actions, and tracking activity.
Click HERE to view the Customer Usage Log article.
Shipped Report
The Shipped Report provides a financial overview of all shipments, including:
-
Buy and sell costs.
-
Margin breakdowns.
-
Carrier and customer references.
-
Full address data.
Use it for auditing freight charges, tracking deliveries, and verifying invoices.
Shipment History
Unlike the Shipped Report, Shipment History focuses on operations. Search, filter, and sort all shipments by date, status, carrier, reference numbers, and more.
Carrier Summary
Analyze shipping activity across carriers with data on:
-
Shipment volume.
-
Total revenue.
-
Weight moved.
-
Profit margins.
Attach Documents
Upload and manage organization-level documents such as brokerage agreements, W9s, and credit applications.
Commissions
Add or remove commissions for the selected customer, selecting the sales rep, calculation type, amounts, and shipment types.
Click HERE to view the Commissions article.
Merge Customers
Consolidate duplicate customer profiles into one unified record. All data (invoices, shipments, tariffs, staff, etc.) from the source organization is transferred to the target organization.
Important: This action cannot be undone.
Import Shipments
Easily import shipments for the selected customer from this section.
Customer Staff List
View, add, and edit staff members linked to the customer. You can access individual Staff Profiles directly from the Company Profile or the Customer drop-down menu.

Bulk Operations Documents
This setting allows users to download and email custom templates as PDF files directly from the Bulk Operations Tools available on the Shipment Search page.
Click HERE to view more about Bulk Operations Documents.
Shipment Defaults
This section will show if any default shipment status is set at the customer level.
-
When your customer creates an LTL shipment in the customer portal, if no shipment default is set, the shipment will automatically be created in Ready status by default (and dispatched to the carrier if an API connection exists).
-
When your customer creates a Truckload shipment in the customer portal, if the default shipment is not set, the shipment will automatically be created in Committed status by default.