Overview
The Truckload module in the TMS brings together every essential tool you need to stay in control of your operations; all in one centralized workspace.
From the Operations Dashboard, giving you a real-time snapshot of every shipment in progress, to intuitive tools that allow you to search, create, and quote shipments instantly, and add new LSP carriers effortlessly; every feature you need is just a click away.
Each section of this article will guide you through these tools step by step, helping you unlock the full potential of your Truckload workflow and streamline your daily operations like never before.
Truckload Operations Dashboard
This dashboard gives you a quick view of all your truckload shipments. It is located on the BackOffice Dashboard. To access, go to BackOffice.
The dashboard is color-coded by shipment status:
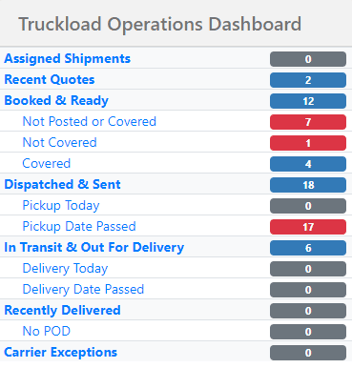
- Gray: Nothing scheduled
- Blue: On schedule
- Red: Needs attention
The dashboard integrates seamlessly with the Company Loadboard feature located under Shipments > Truckload > Company Loadboard. When you click any status link on the dashboard, it automatically opens a filtered list showing only the shipments that match that specific status.
Want to learn more? Read our article on the search engine, "Company Loadboard" for a detailed walkthrough.
Create a Shipment
Short Form
Use the short form to generate a quote quickly. To access, go to Shipments > Create Shipment - Short Form.
Note: Fields with a blue highlight are required.
- Select a customer. Search by Customer Company or Contact Name/Login, then select Search. Locate a contact from the results and select Select Customer.
- Complete the following sections:
- Origin and Destination Information
- Pickup, Delivery, and Shipment Accessorials
- Items to Ship
- Pricing Information
- Cost Calculations
- Select a Save option.
- Save & Duplicate - Saves the shipment and opens a new shipment with duplicate details.
- Save & Add Detail - Saves your progress but allows you to keep editing the shipment.
- Save & View Details - Saves the shipment and brings you back to the Shipment Search page.
Standard Form
Use the standard form to generate a shipment for dispatch. To access, go to Shipments > Create Shipment - Standard Form.
Note: Fields with a blue highlight are required.
- Select a customer. Search by Customer Company or Contact Name/Login, then select Search. Locate a contact from the results and select Select Customer.
- Complete the following sections:
- Shipment References
- To add additional references, select Add Reference Numbers.
- Customer Notes
- Origin and Destination Information
- Pickup and Delivery Information
- Notes - Internal. Will not populate on documents.
- Instructions - External. Will populate on documents.
- Pickup, Delivery, and Shipment Accessorials
- Items to Ship
- Pricing Information
- Cost Calculations
- Additional Information
- Invoice Notes - External. Will populate on documents.
- Price Calculation Notes - Internal. Will not populate on documents.
- Shipment References
- Select a Save option.
- Save & Duplicate - Saves the shipment and opens a new shipment with duplicate details.
- Save & Add Detail - Saves your progress but allows you to keep editing the shipment.
- Save & View Details - Saves the shipment and brings you back to the Shipment Search page.
Truckload Search
Search and filter all of your truckload shipments. To access, go to Shipments > Truckload > Truckload - Search or select a link on the Truckload Operations Dashboard.
For more information, see Truckload Shipment Search.
Truckload Quoting
The Truckload Quoting tool allows you to find a carrier for your load. To access, go to Shipments > Truckload Quoting or access from the Shipment Profile under tools.
For more information, see Truckload Quoting.
Add New LSP Carriers
This is how you add new carriers to the system. To access, go to LSP > LSP Carriers.
For more information, see Add New LSP Carrier.