Table of Contents
1. Carrier Creation
Adding a Carrier in TAI
This section explains how to add a carrier in the TAI system, including how to use the LSP Carrier page, understand carrier types, and complete the carrier setup process.
Accessing the LSP Carrier Page
- Navigate to the LSP tab in the TAI system.
- Select the LSP Carrier option to open the carrier management page.
- The page displays a list of available carriers along with filtering and management options.
Using Filters and Search Options
- Use the available filters to narrow down your carrier search.
- Filter options include:
- Carrier Name or SCAC
- MC Number
- DOT Number
- Click Show Advance to access additional filters.
- Use Exclude Inherited to remove carriers inherited from a parent organization.
- Select Most Recent Shipment Date to add a column showing the latest shipment activity.
- Use Clear Fields to reset all filters and start a new search.
- Click Export to export the carrier list to Excel for offline review.
Carrier List Details
The carrier list displays detailed information for each carrier, including:
- Carrier Name
- MC Number
- SCAC
- DOT Number
- TSA Compliance
- Insurance Expiration Date
- Carrier Packet
- Added Date
- IATA Code
- Address, City, State, ZIP
- Phone Number
- Authority and Safety Status
- Inherited Status
Icons located to the right of each carrier entry allow you to view the carrier's activity log, edit carrier details, or delete the carrier from the list.
Understanding Carrier Types
Before adding a carrier, it is important to understand two key concepts:
- Master Carrier — A list of carriers available in TAI for back-office users to add as broker carriers.
- Broker Carrier — The carrier record created and managed by your organization, linked to a master carrier.
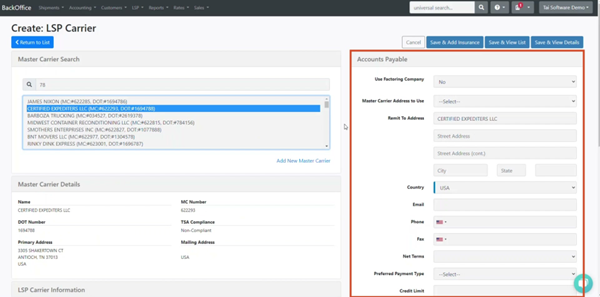
Adding a Carrier
- Click Add Carrier in the top-right corner of the LSP Carrier page.
- In the master carrier search field, enter the carrier's name, SCAC, DOT, or MC number.
- The system will display matching results as you type.
- Select the appropriate carrier from the list.
- Review the master carrier details displayed at the bottom of the page and the accounts payable information on the right.
- At the bottom, check the carrier's authority and safety status:
- Red indicates non-compliance.
- Green indicates compliance.
- Review available shipment types. By default, LTL and Truckload are selected.
- If the carrier should be available for other shipment types, check the corresponding boxes.
- Choose one of the following save options:
- Save and Add Insurance — Opens the Create Carrier Insurance modal.
- Save and View List — Returns to the carrier list page.
- Save and View Details — Opens the carrier's profile for review.
Adding a New Master Carrier
If the carrier does not exist in the master carrier list:
- Scroll to the bottom of the master carrier search page.
- Click Add New Master Carrier.
- The system will confirm whether you searched for the carrier before adding. Select Yes to proceed.
- The Add Carrier Master modal will open.
- Enter all required carrier information.
- MC and DOT numbers are required fields.
- If the carrier is intrastate, check the Intrastate Carrier option to make these fields optional.
- After entering all information, click Add Carrier.
- Confirm the data and click Save.
Carrier Onboarding Integrations
TAI integrates with MyCarrierPackets, RMIS, and HWY to streamline carrier onboarding.
Once a carrier is set up, the system performs a synchronization every five minutes to update carrier packet and insurance information in the TMS.
For more details on carrier onboarding integrations, refer to the TAI Knowledge Base.
2. Carrier Editing
Carrier Edit Screen and Configuration
This section describes how to access and configure carrier details within the Tai system, including editing carrier records, managing accounts payable information, scoring carriers, and updating compliance and regional preferences.
Accessing the Carrier Edit Screen
- To open the carrier edit screen, click the blue pencil icon next to the carrier name in the carrier list.
- Alternatively, open the carrier's profile and select Edit Record.
Master Carrier Details
- In the Master Carrier Details section, you can mark a carrier as a favorite.
- Favorited carriers will display in both the carrier list and the truckload quoting screen.
- Update accounts payable information as needed:
- Add or modify a factoring company.
- Update the remit-to address.
- Adjust net terms and other payment details.
LSP Carrier Information and Scoring
- In the LSP Carrier Information section, assign a score to the carrier using the STARS rating system.
- Provide a reason for the score by entering a note in the score text field.
- The score note will be visible when hovering over the stars anywhere they appear in the TMS, such as on the truckload quoting page.
Factor Automation Integration
- Use the Factor Automation option when your organization has an integration with a factoring company, such as Denim Hall Pay or Triumph Business Capital.
- This option automates factoring processes and ensures accurate payment routing.
Carrier Status Management
- Change the carrier status as needed: Enabled, Blocked, or Disabled.
- When a carrier is set to Disabled:
- A warning will appear if the carrier is selected for a shipment.
- The Select for Shipment option will be unavailable in the truckload quoting screen.
- The carrier will not appear in the carrier list for manual selection.
- When a carrier is set to Blocked:
- The carrier is added to the block list.
- The carrier remains visible but cannot be selected for shipments.
- Visual cues indicate that the carrier is blocked.
- Refer to the knowledge base for additional details on carrier status behavior.
Carrier Compliance and Identification
- Specify whether the carrier operates Interstate.
- Indicate if Form 1099 is required.
- Enter the carrier's tax ID.
- Assign a default carrier representative.
- Add carrier notes to provide important information for users when selecting this carrier.
Trailer Types and Supported Equipment
- Edit the trailer types supported by the carrier.
- For each trailer type, enter the number of available units.
- Update supported shipment types as needed below the trailer type section.
Preferred Regions Configuration
- Review and update the carrier's preferred regions using the color-coded map:
- Gray indicates the region is not supported.
- Aqua indicates inbound support.
- Light blue indicates outbound support.
- Dark blue indicates both inbound and outbound support.
- Click on a state to cycle through the available status options until the desired one is selected.
- Carrier onboarding integrations automatically import preferred regions during synchronization.
- If you are new to Tai, provide this information to your onboarding specialist to enable bulk upload during carrier import.
Updating Compliance Information
- Update compliance details using the same process available in the carrier profile section.
- Ensure all compliance fields are accurate and up to date before saving changes.
This completes the procedure for accessing and configuring carrier details within the Tai system.