Table of Content
- Introduction
- Tariff Profile
- Tariff Lane
- Tariff Template
- Tariff Accessorials
- Fuel Schedules
- Tariff Links and Sell Tariffs
Introduction
Tai handles API integrations with most national LTL carriers and a few Truckload carriers. However, in cases where a broker has contracted rates with a carrier not currently supported, a manual tariff can be created to allow those rates to populate through the normal shipment creation workflow as well.
To see a full list of supported carriers, refer to API /EDI Supported Carriers.
If Tai supports the carrier, the tariff can be created through the Tariff Wizard.
Manual tariffs can be added for all of our supported shipment types (LTL, Truckload, Drayage, White Glove, etc.), and the user will need the following staff permissions to create them:
- Tariff Add Edit
- User Allowed Org Access
Note: The lanes will be created based on the origin and destination zip codes or states, not cities.
Create Tariff Profile
To create the tariff profile, go to the main dashboard and click Rates > Tariffs > Add New Tariff.

- Name: Even though the name will be built automatically, enter a preliminary name to save the tariff. If the tariff is blanket for all customers, the name will start with a "BL," and if the tariff is customer-specific, it will start with a "CS." The name of the customer or the organization will follow, as will the carrier's SCAC.
- Carrier: Enter the carrier for which the tariff is for. You can look for MC, DOT, SCAC, or name. If a "Sell" tariff is needed, the broker may have to create a dummy carrier to assign it to the tariff.
- Mode: Select the mode for which the tariff is for.
- Effective Date/Expiration date: The system will default the effective date to today and the expiration date to 20 years.
Important: During rating, Tariff and Margin expiration dates are evaluated using UTC, while the Expired and Expiring Soon indicators in the tariff list are based on local time. As a result, a tariff may still appear valid in the list even though it is no longer applied during rating.
- Service level: Defaults to 'Normal' if nothing is selected.
- Status: Whether the tariff is visible to the users and customers.
- Pricing Instructions: These will show up, along with the rate, under the Generate Smart Quote section.

- Source Name: For manual tariffs, this field will remain empty unless you need to utilize SMC/CzarLite base pricing. This is used when the tariff will be connected to an integration source.

- Tariff Owner: Typically, it will be the accounting organization or the parent account, which is the company in charge of paying the carrier.
- Check the "Customer Specific" box if it needs to be linked to a particular customer. To complete this, a tariff link will also need to be added.
- Bill To Type: 1st or 3rd party collect and prepaid are the options.
- Bill To Address & Account Number: These will populate on the BOL and default to the tariff owner's organization address.

- Tariff Settings: Select if the tariff will be available for the front office, the rate requirements, and the lane's initial points. These can then be modified and adjusted on the tariff lane.
For testing purposes, uncheck the Display In Front Office setting until the tariff is working properly and check the "All US Points" option.
- Contract Rate: This option establishes a sell tariff, which consists of a predetermined selection of lanes and volumes that a broker commits to offering at a designated price. These rates are determined through negotiations between the broker and the customer.

If Contract Rate is checked, the system will eliminate the need for a carrier. To learn more about Contracted Customer Rate, please click HERE.
Tariff Profile
After creating the tariff, a tariff profile will be generated by the system, including the selected lanes from the previous section. At the top of the profile, users will find the following features:
- Activity Log: Record all the changes made to the tariff.
- Accessorials: Tariff and lane. This process will be described throughout this article.
- Tariff Tools: This section is used to upload the tariff template with the date on it, add the tariff links to make the tariff customer-specific, add margins to the tariff and/or accessorials, and modify the tariff BOL.
- Import/Export CSV: Feature to export or import the tariff lanes.

Note: The Tariff Profile displays a maximum of 50 tariff lanes. The Search Keyword field only searches within the lanes currently displayed and will not return results for lanes beyond this limit.
To view or edit all tariff lanes, use Import/Export CSV > Export Tariff. The exported file contains every lane associated with the tariff. After making changes, import the updated file back into the tariff. Importing a tariff replaces all existing lanes with the contents of the imported file.
Tariff Lane
At the bottom of the tariff profile, the user can find the existing lanes and how to edit them, the option to add a new lane, and the ability to test a particular lane using the origin and destination zip codes:
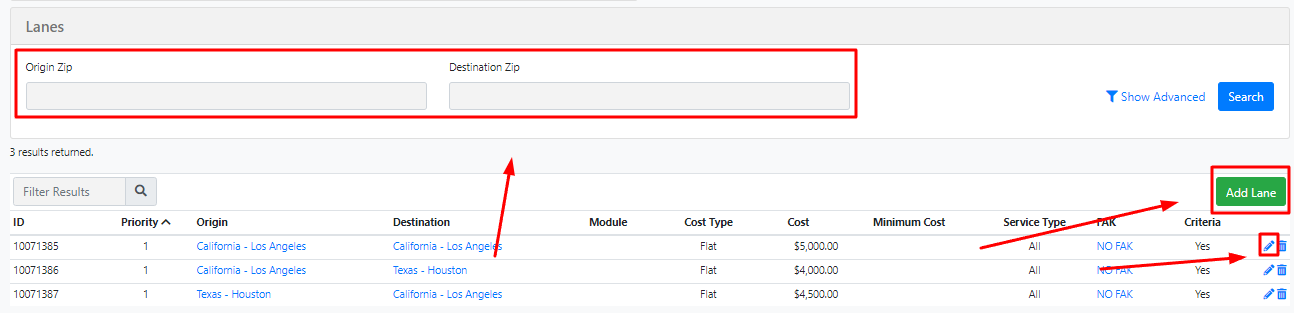
To add a new lane, click the green Add Lane button. Click the edit pencil next to the lane information to edit an existing one. Once editing the lane, the user will see the following fields:

- Origin and Destination Region: These will need to be created through the tariff template.
- Transit SCAC: Typically, the carrier SCAC will be populated in this field. If need be, enter the SCAC of the carrier that should be handling that lane.
- Trailer Type: This field allows users to specify 3 compatible trailer types for each lane (Flatbed, Refrigerated, and Van).
-
The TMS will then automatically compare the shipment's trailer type with the compatible types defined in the Tariff Lane, ensuring only valid lanes are considered during rating.
-
Below is how shipments are rated/filtered based on the three trailer types specified in the Trailer Type field within the tariff.
Flatbed Refrigerated Van - 48 Flatbed
- 53 Flatbed
- Van Flatbed
- 50 Flatbed
- 48 Flatbed Conestoga
- 53 Flatbed Conestoga
- 48 Flatbed Tarp
- 50 Flatbed Tarp
- 53 Flatbed Tarp
-
Sprinter Van Reefer
-
24 City Truck Liftgate Reefer
-
28 City Truck Liftgate Reefer
-
40 Straight Truck Tailgate Reefer
-
48 Van Reefer
-
48 VanTailgate Reefer
-
53 Van Dry Tandem Reefer
-
53 Van Reefer Tri Axle
-
53 Van Reefer Quad Axle
-
53 Van Reefer
-
48 Dry Van Reefer
-
53 Dry Van Reefer
-
53 Reefer
- Everything Else
-
- Service Type: The system will use the SCAC to hit CarrierConnect and determine if the carrier services that lane through a direct or an indirect connection. For manual tariffs, select "All" to avoid errors from CarrierConnect.
- Transit Time: If available, enter the transit time days. If not, leave in 0.
- Priority: If the same lane is duplicated in the system with different lane criteria, the priority will determine which lane will provide the rate.
- FAK: It stands for “Freight of All Kinds.” It’s a pricing method used during negotiation with carriers that groups freight class ranges so that they are billed or rated at the same class.
- Lane Criteria: The user can select and specify the criteria needed for the lane to provide a rate, including mileage, weight, class, and so on.
- Lane Calculation Type: Describes how the rate is going to be calculated based on CWT, mileage, pieces, flat amount, etc.
- Lane Upcharge Type: Describes if the rate will be marked up based on the same criteria as the calculation type.
- Lane Notes: Optional internal comments.
Tariff Template
To download the current template on a tariff, open the tariff profile and click Import/Export CSV > Export Tariff. The file will be downloaded with the tariff name. It's an Excel book with three sheets.
- Regions: It's the section where the user can specify the origin and destination points.
- Region Name: It must be as unique as possible to avoid duplicate zip codes for origin and/or destination.
Region names are shared across the entire platform, so it is important to make them as unique as possible to avoid confusion. For example, instead of a generic name like "CA," use something specific like "CA - Tai Software."
-
- Region Type: The user can select from State, Postal Code, Postal Code Range, or Country. These options have a number assigned, which can be found on the cheat sheet attached to this article.
- The user can then enter all the states, zip codes, or zip code ranges that correspond to each region's name.
- FAKs: Section where the class negotiation with the carrier and/or customer can be determined.
- FAK Name: it has to be as unique as possible to avoid duplicate classification ranges.
- FAK Value: The class value that will be added to the rate.
- Fak Start/End: Range of classes that will be then defaulting to the FAK Value.
- Tariff Import: The section where the lanes are created based on previously added regions.
- Tariff Profile ID: It will populate automatically and doesn't need to be changed.
- Lane Calculation Type: This describes how the rate will be calculated based on CWT, mileage, pieces, flat amount, etc. The cheat sheet will provide the number corresponding to each one.
- Module Name: This will only be used for SMC/CzarLite base pricing. Can be left blank.
- Priority: If the same lane is duplicated in the system with different lane criteria, the priority will determine which lane will provide the rate.
- Transit SCAC: From the carrier assigned to the lane.
- Intrastate: Can be left as "False."
- Origin Region Name/Destination Region Name: The lanes will be built using the region names for origin and/or destination. For the import to work, these names must match the region names.
- Fak Group Name: This field must match the FAK Name assigned previously. If no FAK is needed, like in the truckload's case, this field can be left as "NO FAK."
- Service Type: The cheat sheet will provide the code corresponding to the service type required. "All" corresponds to code 0.
- Transit Time: If available, enter the transit time days. If not, leave in 0.
- Cost: Correspond to the rate for that lane.
- Minimum Cost: If there is a minimum cost criterion associated with the rate.
- Ignore Minimum Cost: True or False.
- Up Charge Calculation Type: Defaults to 6, or "Do not Upcharge."
- Fields for Upcharge Criteria can be found in columns P to R.
- And Or: Determines if the lane needs to meet all or any of the following criteria.
- Fields for Lane Criteria can be found in columns T to AL.
- Billing Type: Defaults to 0 or "3rd Party."
When the file is ready to be uploaded, open the tariff profile and click Import/Export CSV > Import Tariff. Any existing lanes will be replaced with new ones. After the lanes are updated, upload the Excel file from Tariff Tools > Documents. For future changes and tracking purposes, make sure to have the date of the import on the document name.

Tariff Accessorials
Specifically, for manual tariffs and to have them rate a shipment with accessorials, the user may need to first add the accessorial to the tariff with the corresponding rate. Otherwise, the tariff may error when trying the rate shipment. To do this, go to the tariff profile and click Accessorials > Tariff Accessorials. Once there, click Add New Accessorial Tariff.


- Accessorial: Look for the accessorial to add to the tariff through the name.
- Availability: Select "Required" to always have it display the accessorial and its rate; this is normally needed for Fuel pricing. For Pickup/Delivery accessorials that are selected when needed, these need to have "Normal" selected.
- Calculation Type: This can vary from handling units to weight, percentage, and accessorial schedule.
- Amount: Select the rate, including minimum or maximum.
- Click Update.
Note: The user can choose whether to apply a margin or not to the accessorial. The tariff link will determine the details of this margin.
Fuel Schedules
To add a fuel schedule to the manual tariff, the schedule must first be added to the system. To do this, go to Rates > Accessorial Schedule > Add New Schedule.
- Name: Enter the schedule's name.
- Comments: Optional section for details.
- Valuation Type: Select between pieces, mileage, or weight. In another section, you can change it to the actual value table.
Leave the "Is Master?" option unchecked and click Save. On the new edit page, the actual value table can be imported:
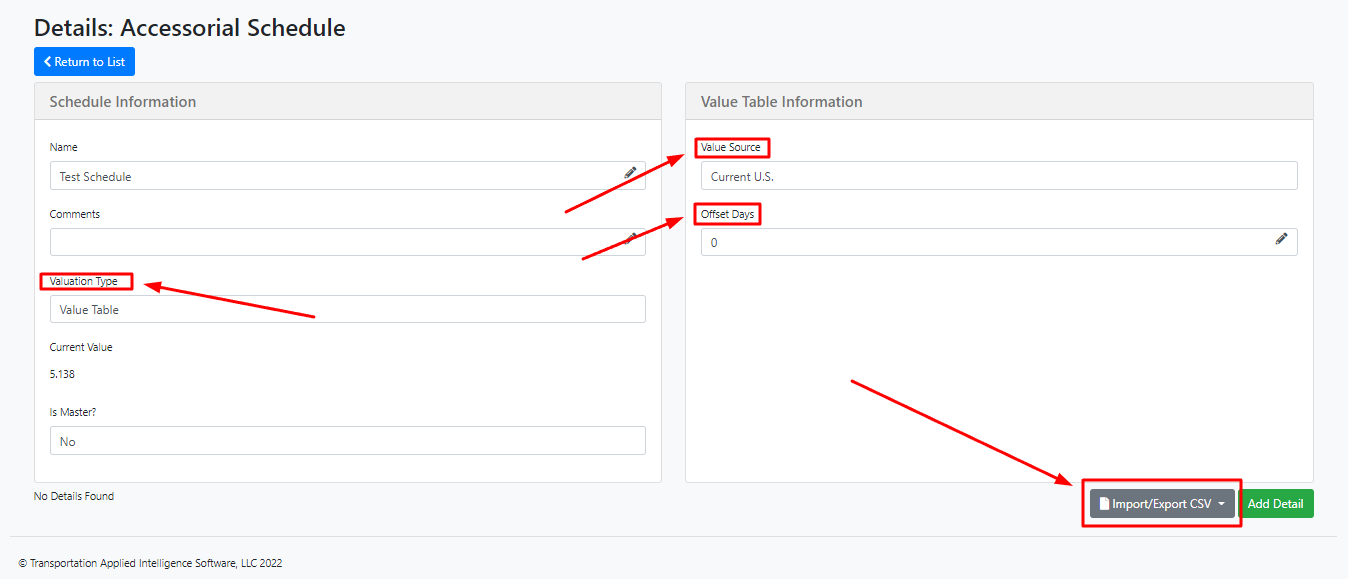
- Valuation Type: Change to Value Table.
- Value Source: Select the currency value source, typically "Current U.S."
- Offset Days: Enter the number of days in a negative if the schedule is currently outdated.
- Click the Import/Export CSV > Template to download the Fuel Schedule template.
- Enter the minimum, maximum, calculation type (mileage, percentage, etc.), and amount on the template.
- Click the Import/Export CSV > Import to upload the new details to the schedule.
Documents:
To add the schedule to the tariff, click the tariff profile, and then Accessorials > Tariff Accessorials > Add New Accessorial tariff.
- For the accessorial, select "Fuel - Fuel."
- Availability: Select "Required" for the price to display when rating.
- Calculation Type: Select "Schedule."
- Look for the schedule created and click Save.
Tariff Links
To add a tariff link to a customer:
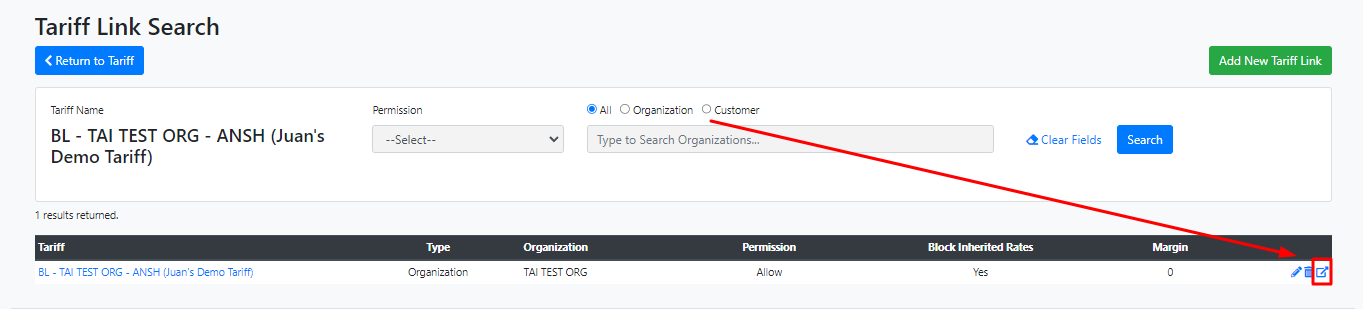
- From the tariff profile, click Tariff Tools > Tariff Links > Add New Tariff Link.
- Under Type, select "Customer."
- For Organization, look for the customer to link the tariff to.
- Under Permission, select "Allow."
- For Block Inherited Rates, select yes or no, depending on the hierarchy in your account and the necessity to block tariffs coming from organizations above the customer level.
- Click the check mark on the far right to save the tariff link.
Once saved, a margin can be added to the link to mark up the linehaul and accessorials on the tariff. To learn more about setting up margins, go to Create a Margin.
Manual tariffs cannot be created for 3PLs.