Table of Contents
1. What is Tai Email Assistant?
2. Email Assistant Configuration
3. Email Assistant Checklist
4. How does Tai Email Assistant work?
5. Email Forwarding Tips
6. Tai Email Assistant Source Settings
1. What is Tai Email Assistant?
Tai Email Assistant is a tool that can automatically detect when you receive an email that is considered a quote request. Tai can extract pertinent information such as the shipper and consignee postal codes, pallet counts, weights, freight class, and accessorials. If it’s all there, Tai will generate a customer-specific quote based on the rates and margins they have available and you can easily draft an email response to the customer in minutes. Tai email assistant will also add documents to your Document Processor if any document was added to the email. If it's a new customer that hasn't been added to the TMS yet, we'll use your "guest account" and follow the same workflow with a default margin that you can change later.
________________________________________________________________________________
Steps, on how to use the Email Assistant:
- Setup a staff mailbox configuration with read permissions.
- In a pinch, you can also forward a quote request email to Tai Email Assistant, assistant@taicloud.net.
- Tai extracts the quote request details and finds available rates.
- Shipment is created in quoted status with LCR rate assigned. You can draft an email response directly from this shipment.
2. Email Assistance Configuration
The Onboarding/Support team will set up the integration in the TMS. 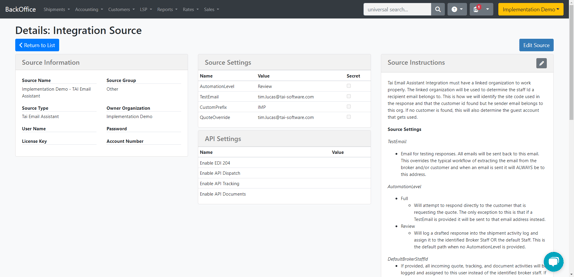
Then to use it, there are two ways that Email Assistant can get to work for you.
- Direct staff mailbox configuration with read access automatically captures all incoming emails.
- Email Forwarding to assistant@taicloud.net allows you to choose what gets forwarded instead.
Staff Mailbox connection
You can see out guide on staff mailbox connections here. We support connections with Google, Microsoft, Front, or a manually configured IMAP/SMTP mailbox connection.
Email forwarding to assistant@taicloud.net
If you would prefer to forward your emails to Tai Email Assistant, then there may be no additional setup required. This method does require you to either manually forward each request that you would like Tai to handle or set up some forwarding rules that will automatically forward specific emails for you. With this option, Tai will still extract the required information and create a shipment if all the required information is present. Simply begin forwarding your quote requests to assistant@taicloud.net or add a forwarding rule that will do this for you. We recommend the latter.
3. Email Assistant Checklist
Email Assistant Setup Checklist
- Create a Tai Email Assistant integration within LSP > Integration Sources.
- Setup Staff mailbox configuration or email forwarding rules.
- LSP Staff emails set on LSP Staff profiles.
- Customer accounts set up with desired margins.
- Customer emails set on Customer Staff profiles.
- Tariffs configured using the Tariff Wizard.
- Content Templates configured for easy email response templates (Uses a master template by default).
- EMAIL Automation Quote Response (Successful Response to Quote Request)
-
- EMAIL Automation No Rates Returned (No rates available and a spot quote is needed)
- Guest Account ID configured (This is the guest account we'll use when a customer isn't found).
Needs to be a Customer Staff!
Helpful Tips
- Guest Account Config
You can confirm these two details are configured on your Onboarding Guide. To view the Onboarding Guide navigate to the LSP dropdown in the back office and click on "Onboarding Guide". If these are not set then you can send over the LSP Staff ID you would like to use for your "Email Sender Id" and the "Customer Staff Id" you would like to use for your "Guest Account Id" to support@tai-software.com.

- Email requirements to get a Quote, send it to assistant@taicloud.net
- Origin zip
- Destination zip
- Handling count
- Weight
- Dims or class
- Complete origin (name, address, city, state, contact, phone)
- Complete destination
- Accessorials
- Pickup date/time
- Commodity description
- (Required) Set up a Guest Account and Margin:
To serve as a catch-all for any customers that are new or not yet added to your system. Speak with your Client Success Specialists for assistance with this step. - (Optional) Update the auto-response templates to make sure your emails look and feel the way you would like. There are 2 templates:
- EMAIL Automation More Information Needed
- EMAIL Automation No Rates Returned
4. How does Tai Email Assistant Work?
- Email is captured by Tai and classified as a “Quote Request”. Either by mailbox connection or forwarding.
- Required information is extracted from the email and sent through our automated quote process.
- TMS Customer Account
- Shipper and Consignee City, State and Postal Code
- Pallet Count, Dimensions, Weights and Freight Classes
- Accessorials such as Lift-Gates, Residential, Appointment, etc.
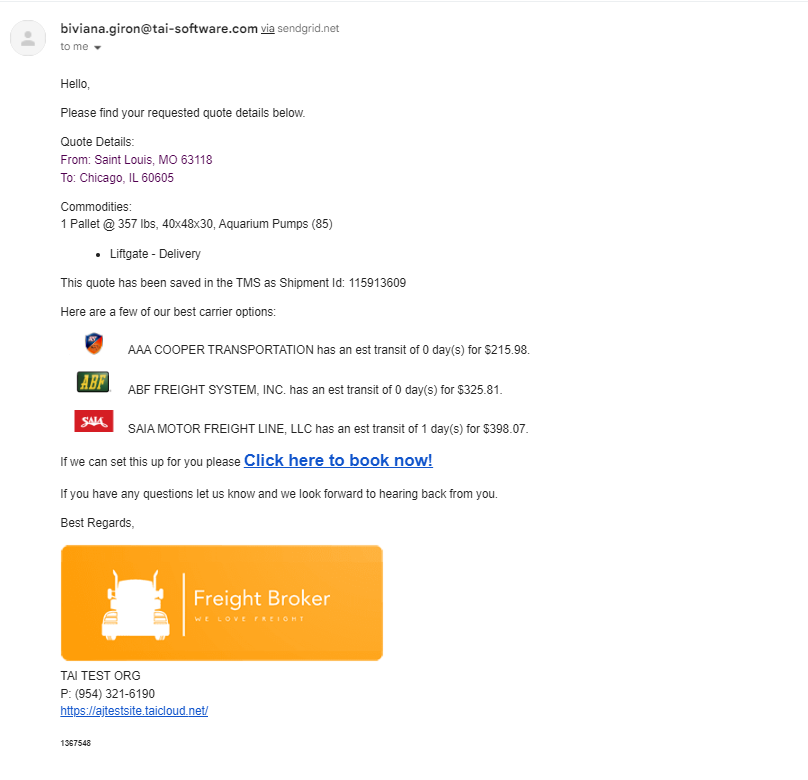
- Tai locates the customer in the TMS and generates the rates for the request selecting the lowest 3 available carriers.
- A shipment is automatically created and saved, original email copy is in activity log, shipment is "assigned" to you as a favorite.
- You should now review the saved quote details and then send a response using the Send Message modal in the TMS.
Successful Response
What happens if the original request is missing information?
It happens. Sometimes the quote requests we receive from our customers do not have everything we need to give them an accurate quote. Sometimes they forget to include the pickup information or maybe they leave out the freight class.
When an email is received that is missing a freight class, we’ll use the weight and dims to calculate one based on density. If one or more pieces of other required information are missing, we won't be able to proceed with generating rates or saving the shipment. In this case the email will remain unread and you can proceed to responding to the customer asking for the missing information.
What if I don't have any rates for the quote that was requested?
If it turns out you don't have any rates to satisfy the request, we'll still create the shipment in a quoted status; however, there won't be any carriers or rates assigned to the shipment. You'll see this when you review your assignment and can begin spot quoting this request for your customer.
- Email is captured by Tai and classified as a “Quote Request” like before.
- Required information is extracted from the email and sent through our automated quote process.
- Tai locates the customer in the TMS and generates the rates for the request but sees there are 0 available carriers.
- Shipment is created and saved as Quote with no carrier assigned or rates.
5. Email Forwarding Tips
There are a few options to use email forwarding with Tai Email Assistant. The quickest way to get started is to begin forwarding any quote requests you receive directly to assistant@taicloud.net. While this is the fastest way to get started, it requires you to watch the mailbox and manually forward requests. The main benefit of Email Assistant is automating this process to increase response time to customers. What we recommend is that you use some mail forwarding rules to automate this step. You can set up your mailbox to automatically forward all of your emails, or set rules to forward specific emails.
Outlook
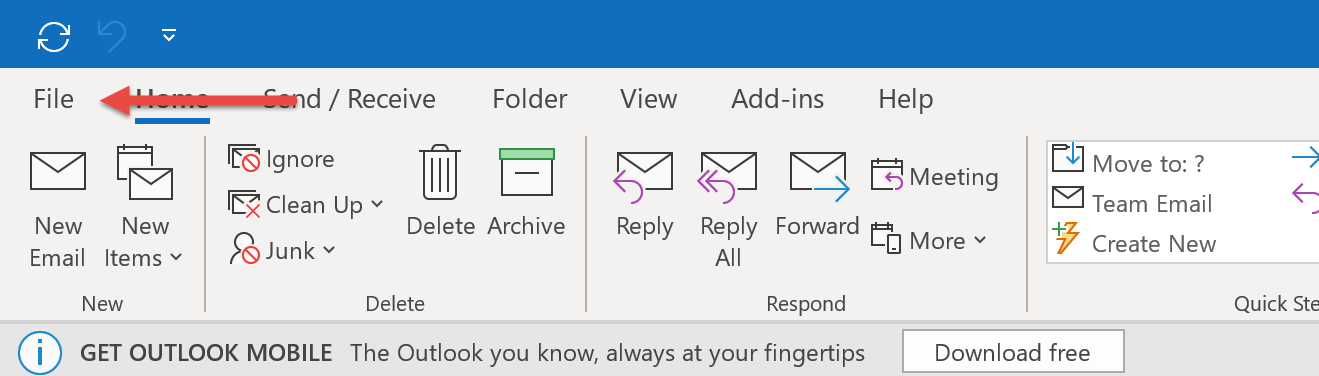
- Click the "File" menu in the top right corner of your Outlook client.
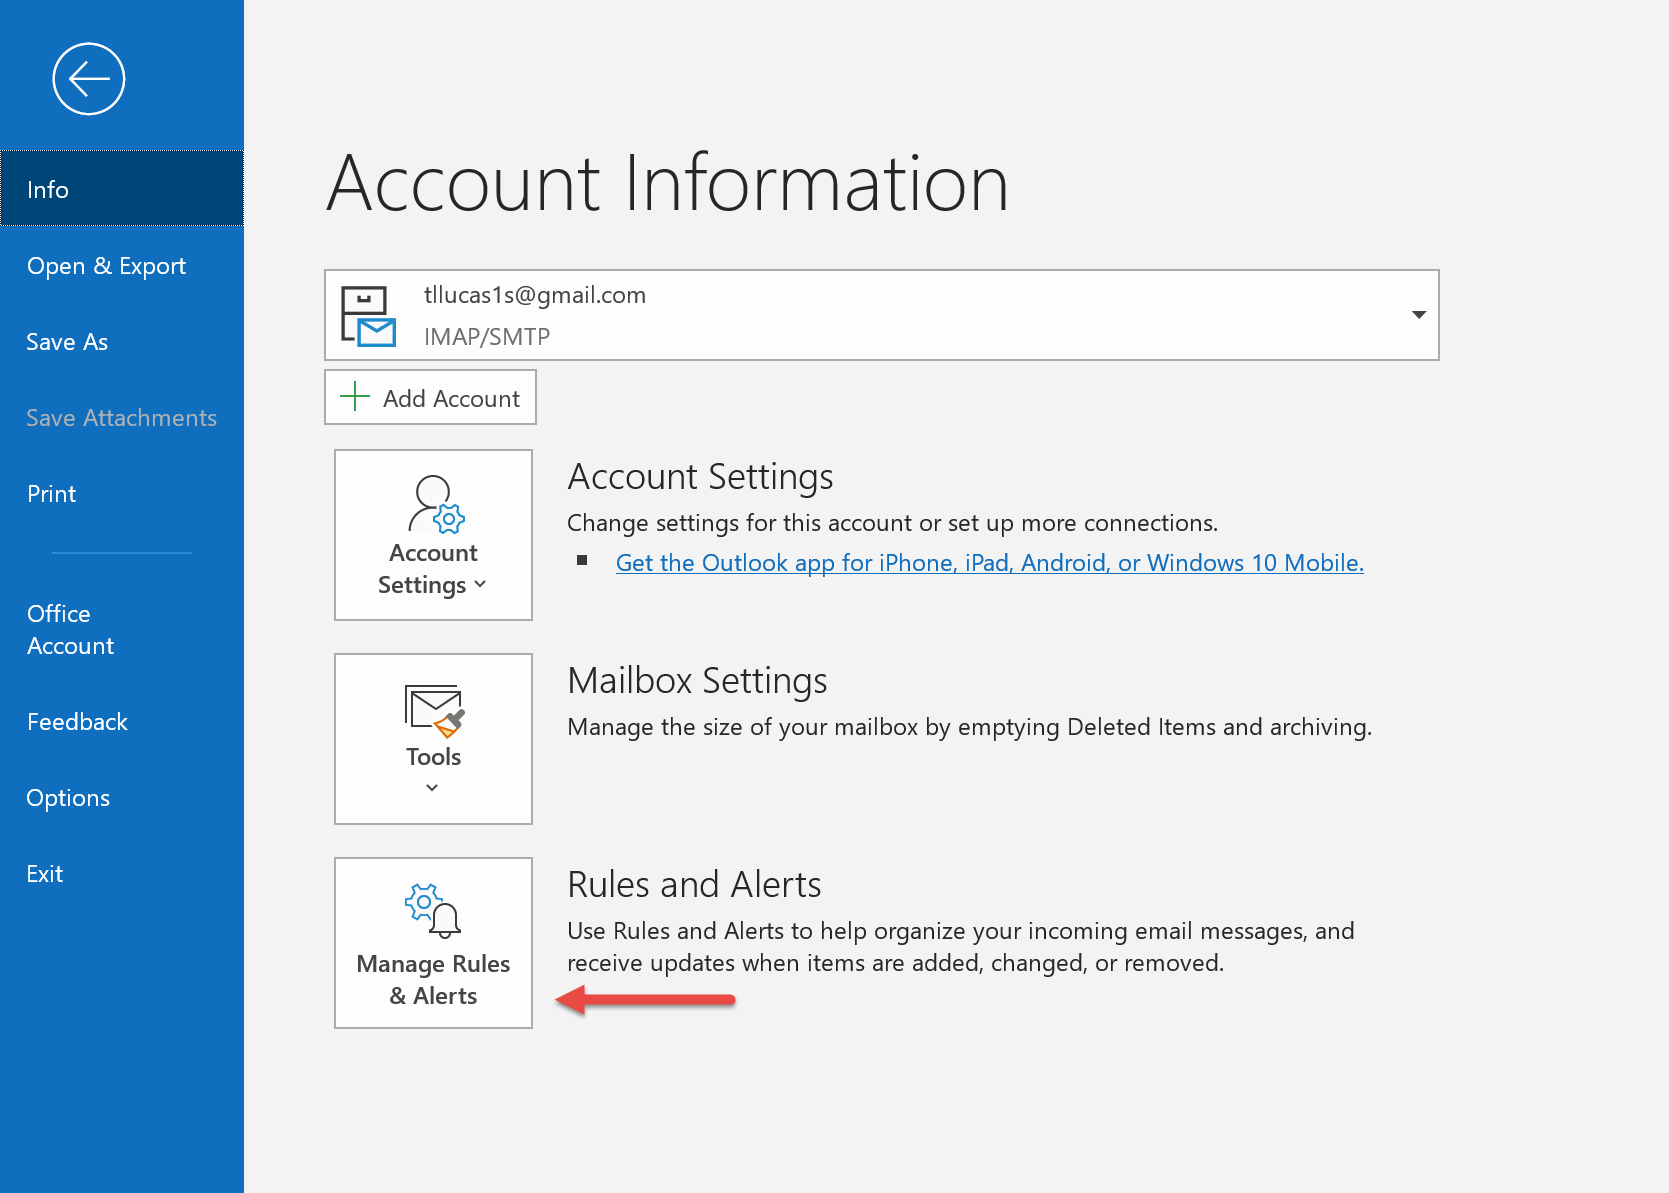
- From the "Info" tab choose "Manage Rules & Alerts".
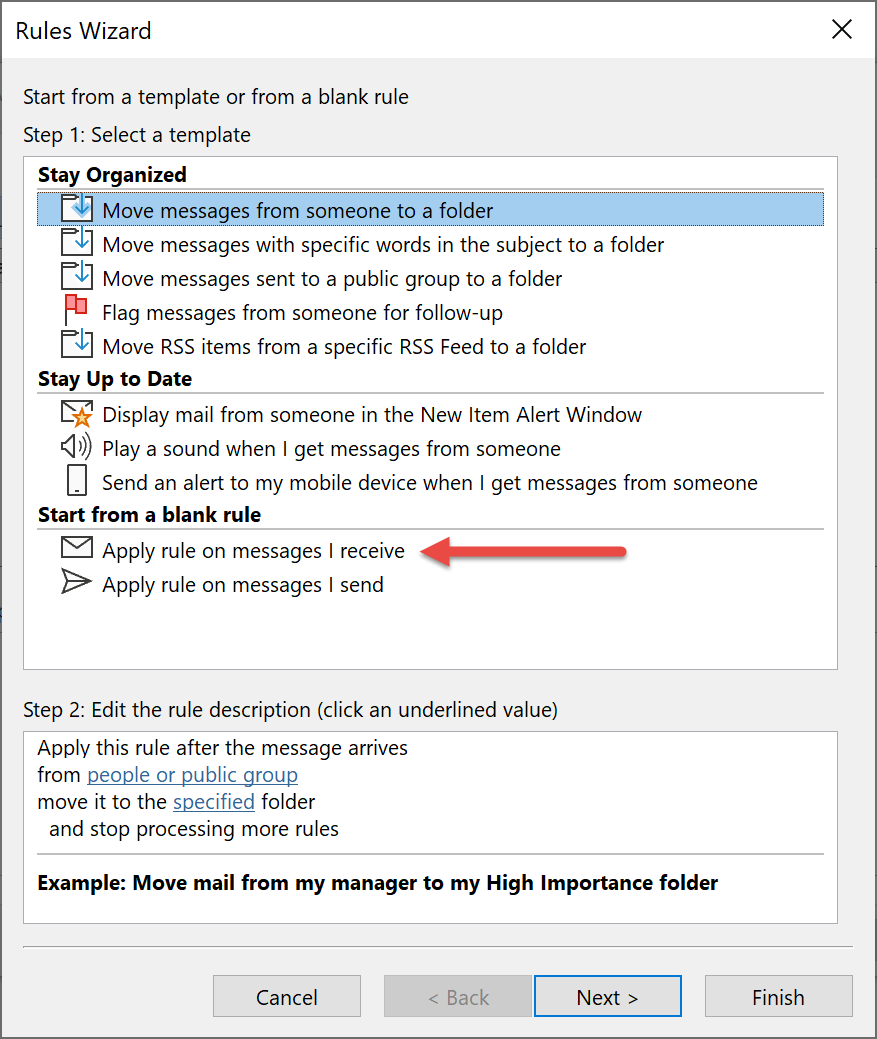
- Using the Rules Wizard you can "Start from a blank rule" by clicking "Apply rule on messages I receive" and click "Next".
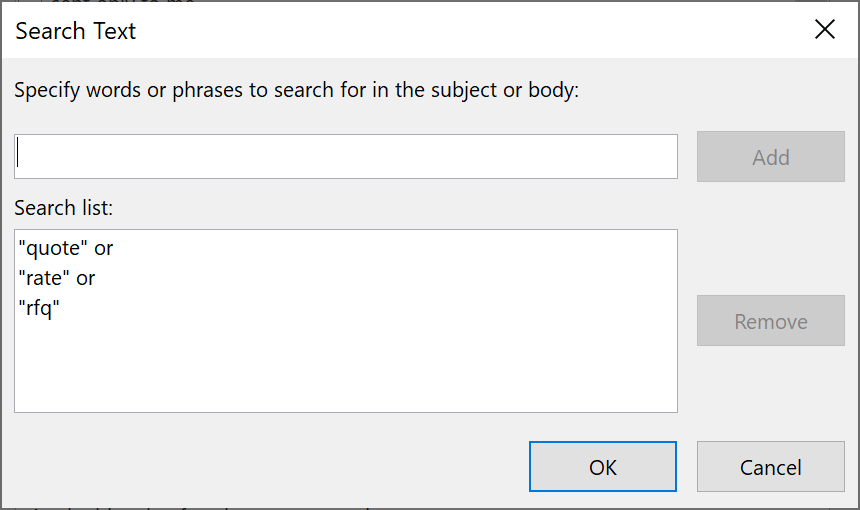
- If you'd like to choose the emails that get forwarded then you can add keywords to search for in the subject or body and click "OK" or skip this part to forward all messages.
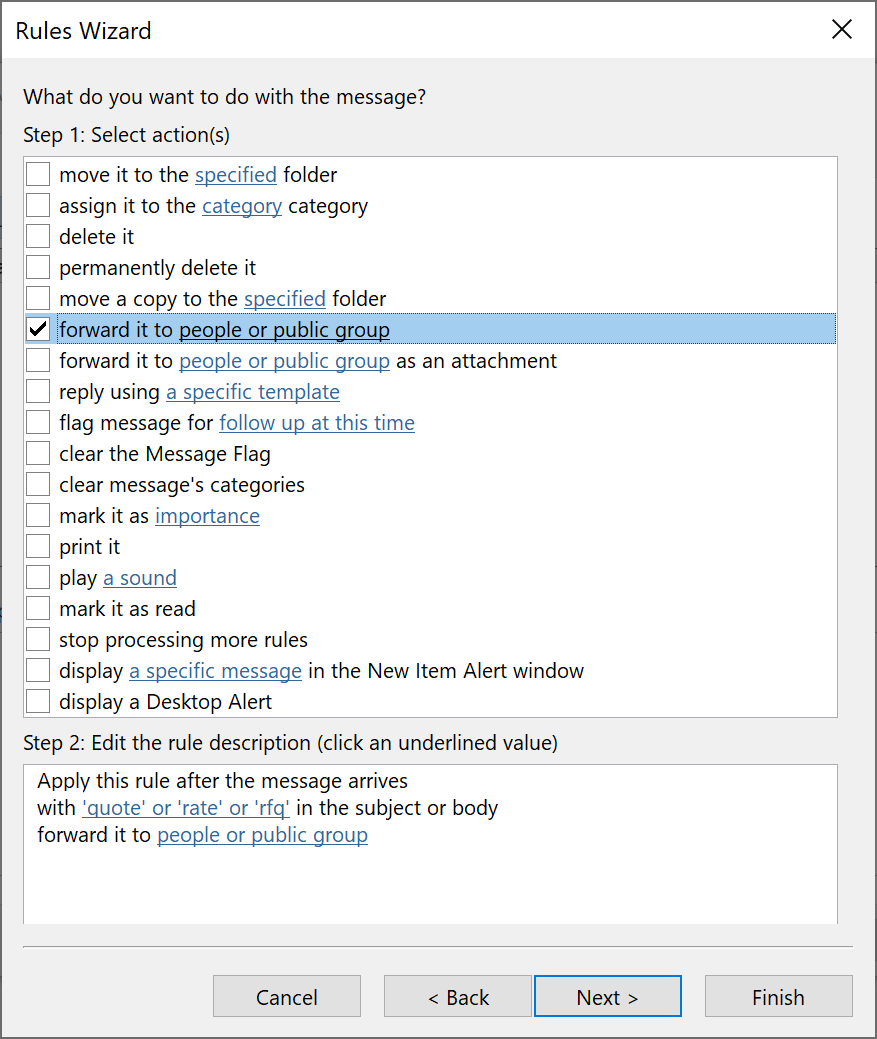
- Next, check the box to "forward it to people or public group" and click "Next".
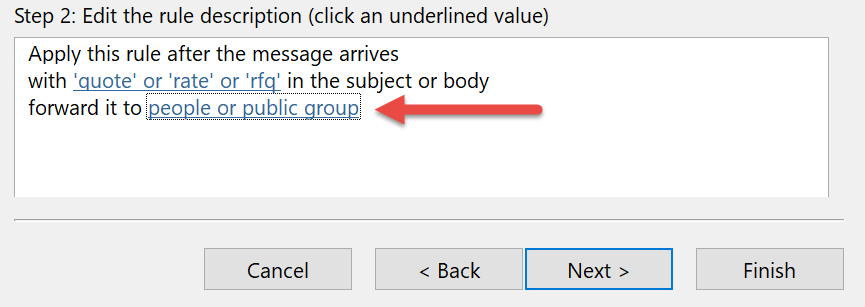
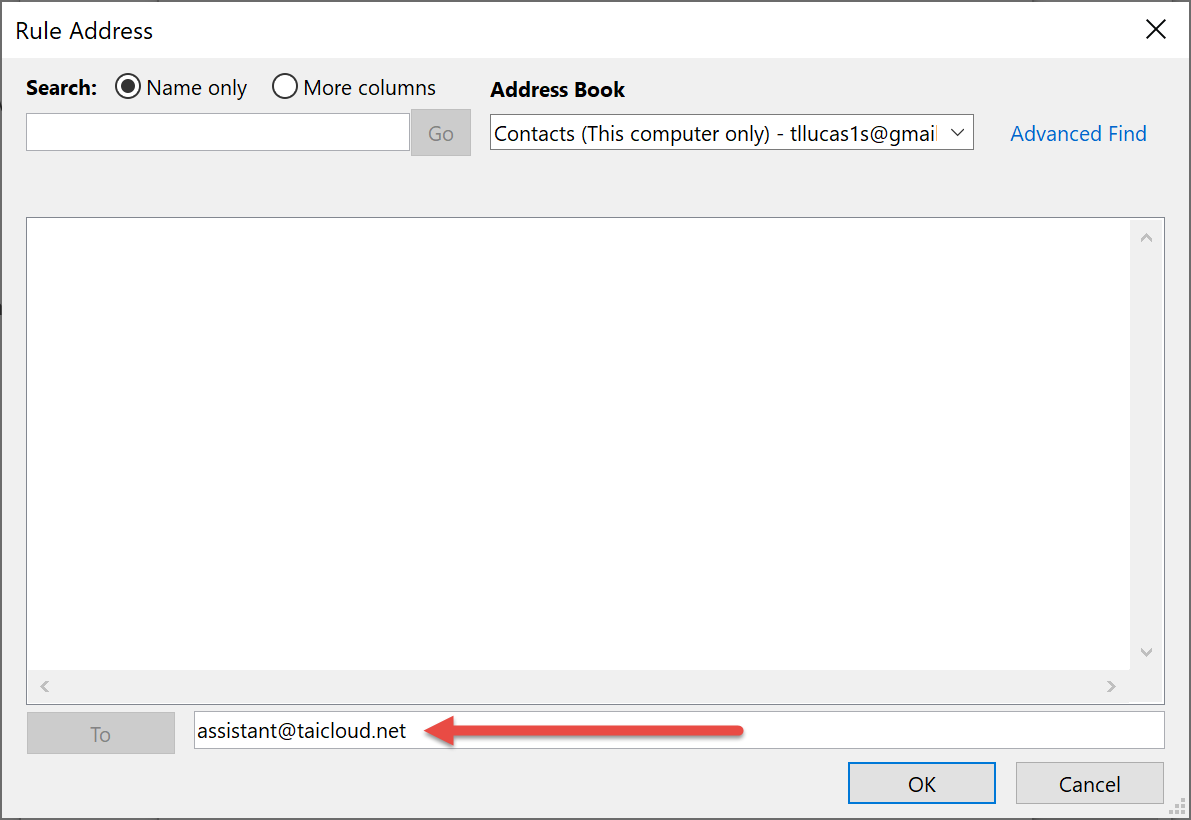
- Click on the link that says "people or public group" and enter "assistant@taicloud.net" when prompted. Choose "OK".
- Finally, confirm your new rule by clicking "Apply" and then "OK" to complete the setup.
Gmail
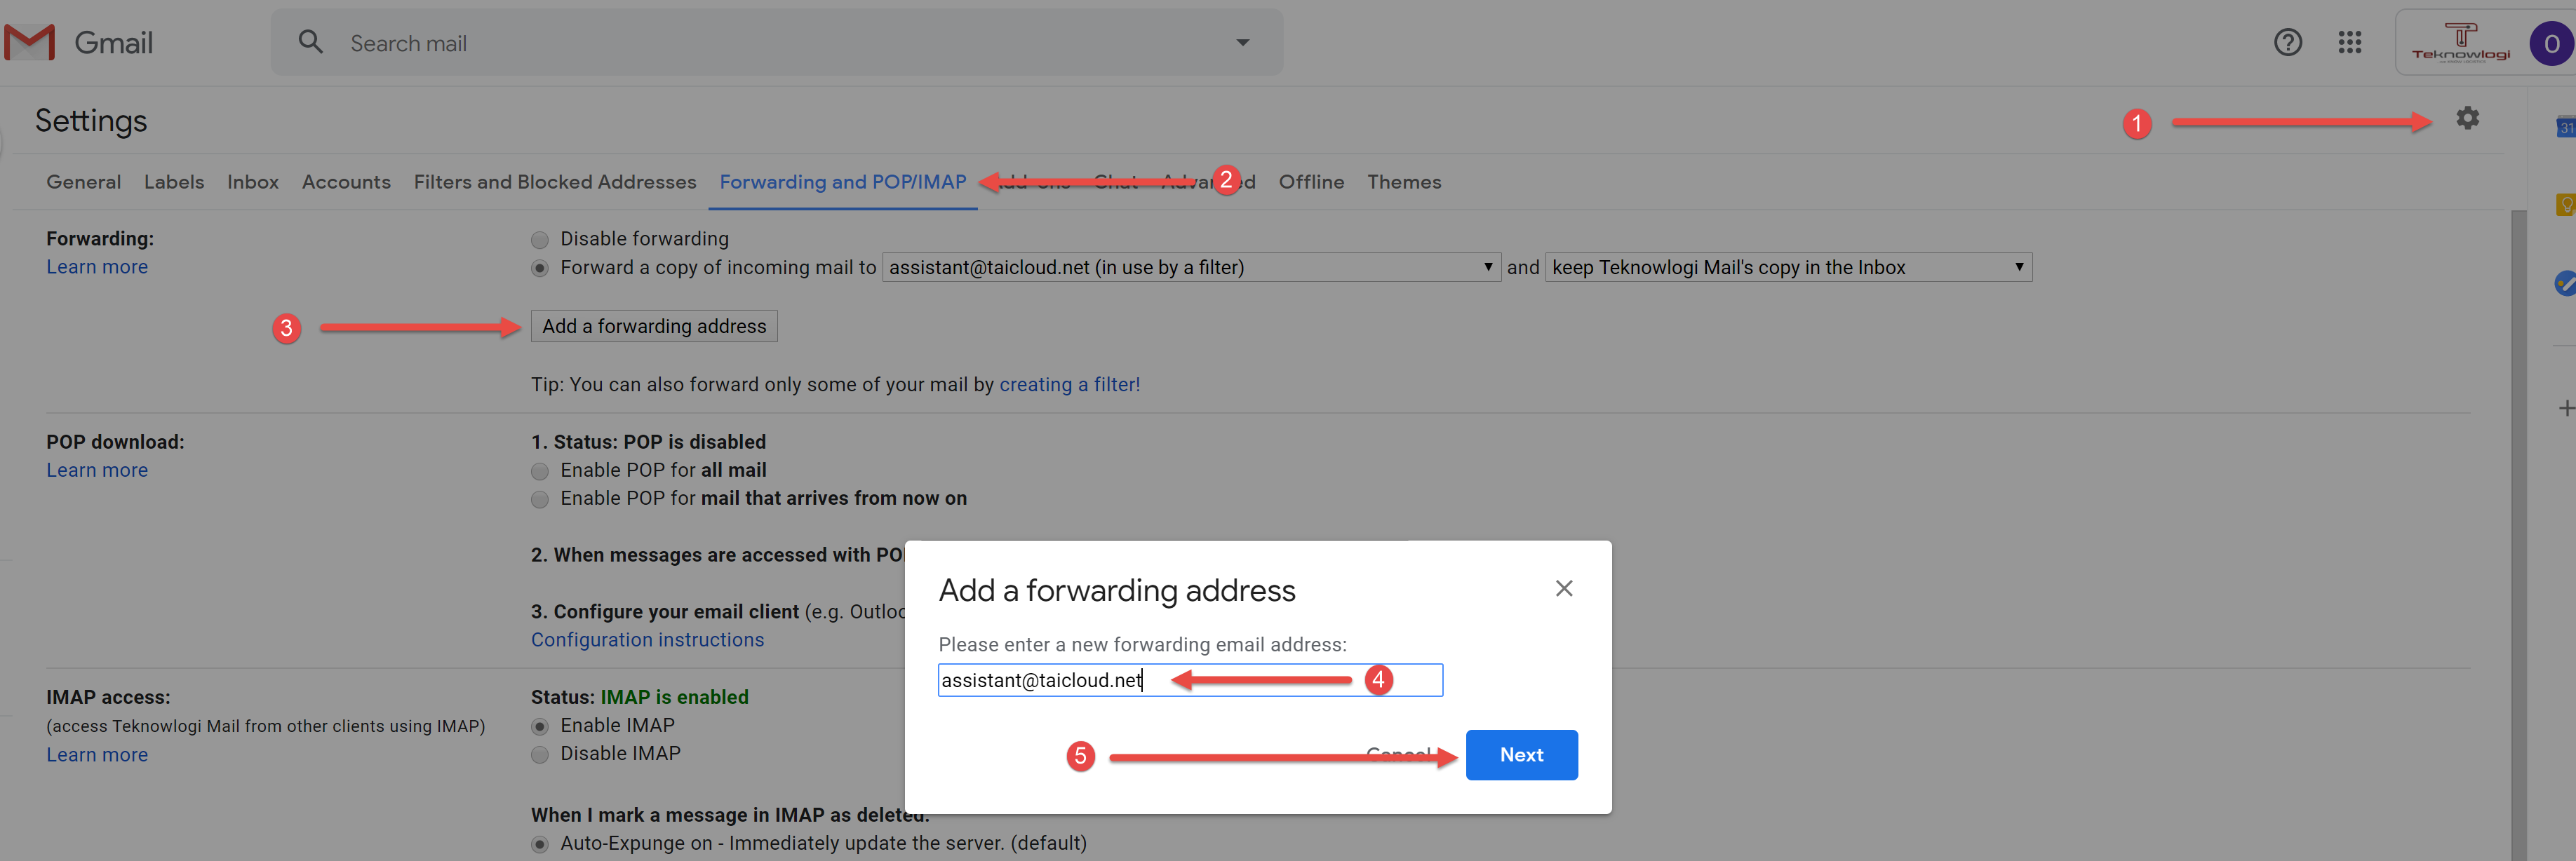
- Click the "Settings" icon in the top right corner of Gmail in your browser.
- From the settings bar click "Forwarding and POP/IMAP".
- Click the button that says "Add a forwarding address".
- Add " assistant@taicloud.net".
- Click "Next" to save.
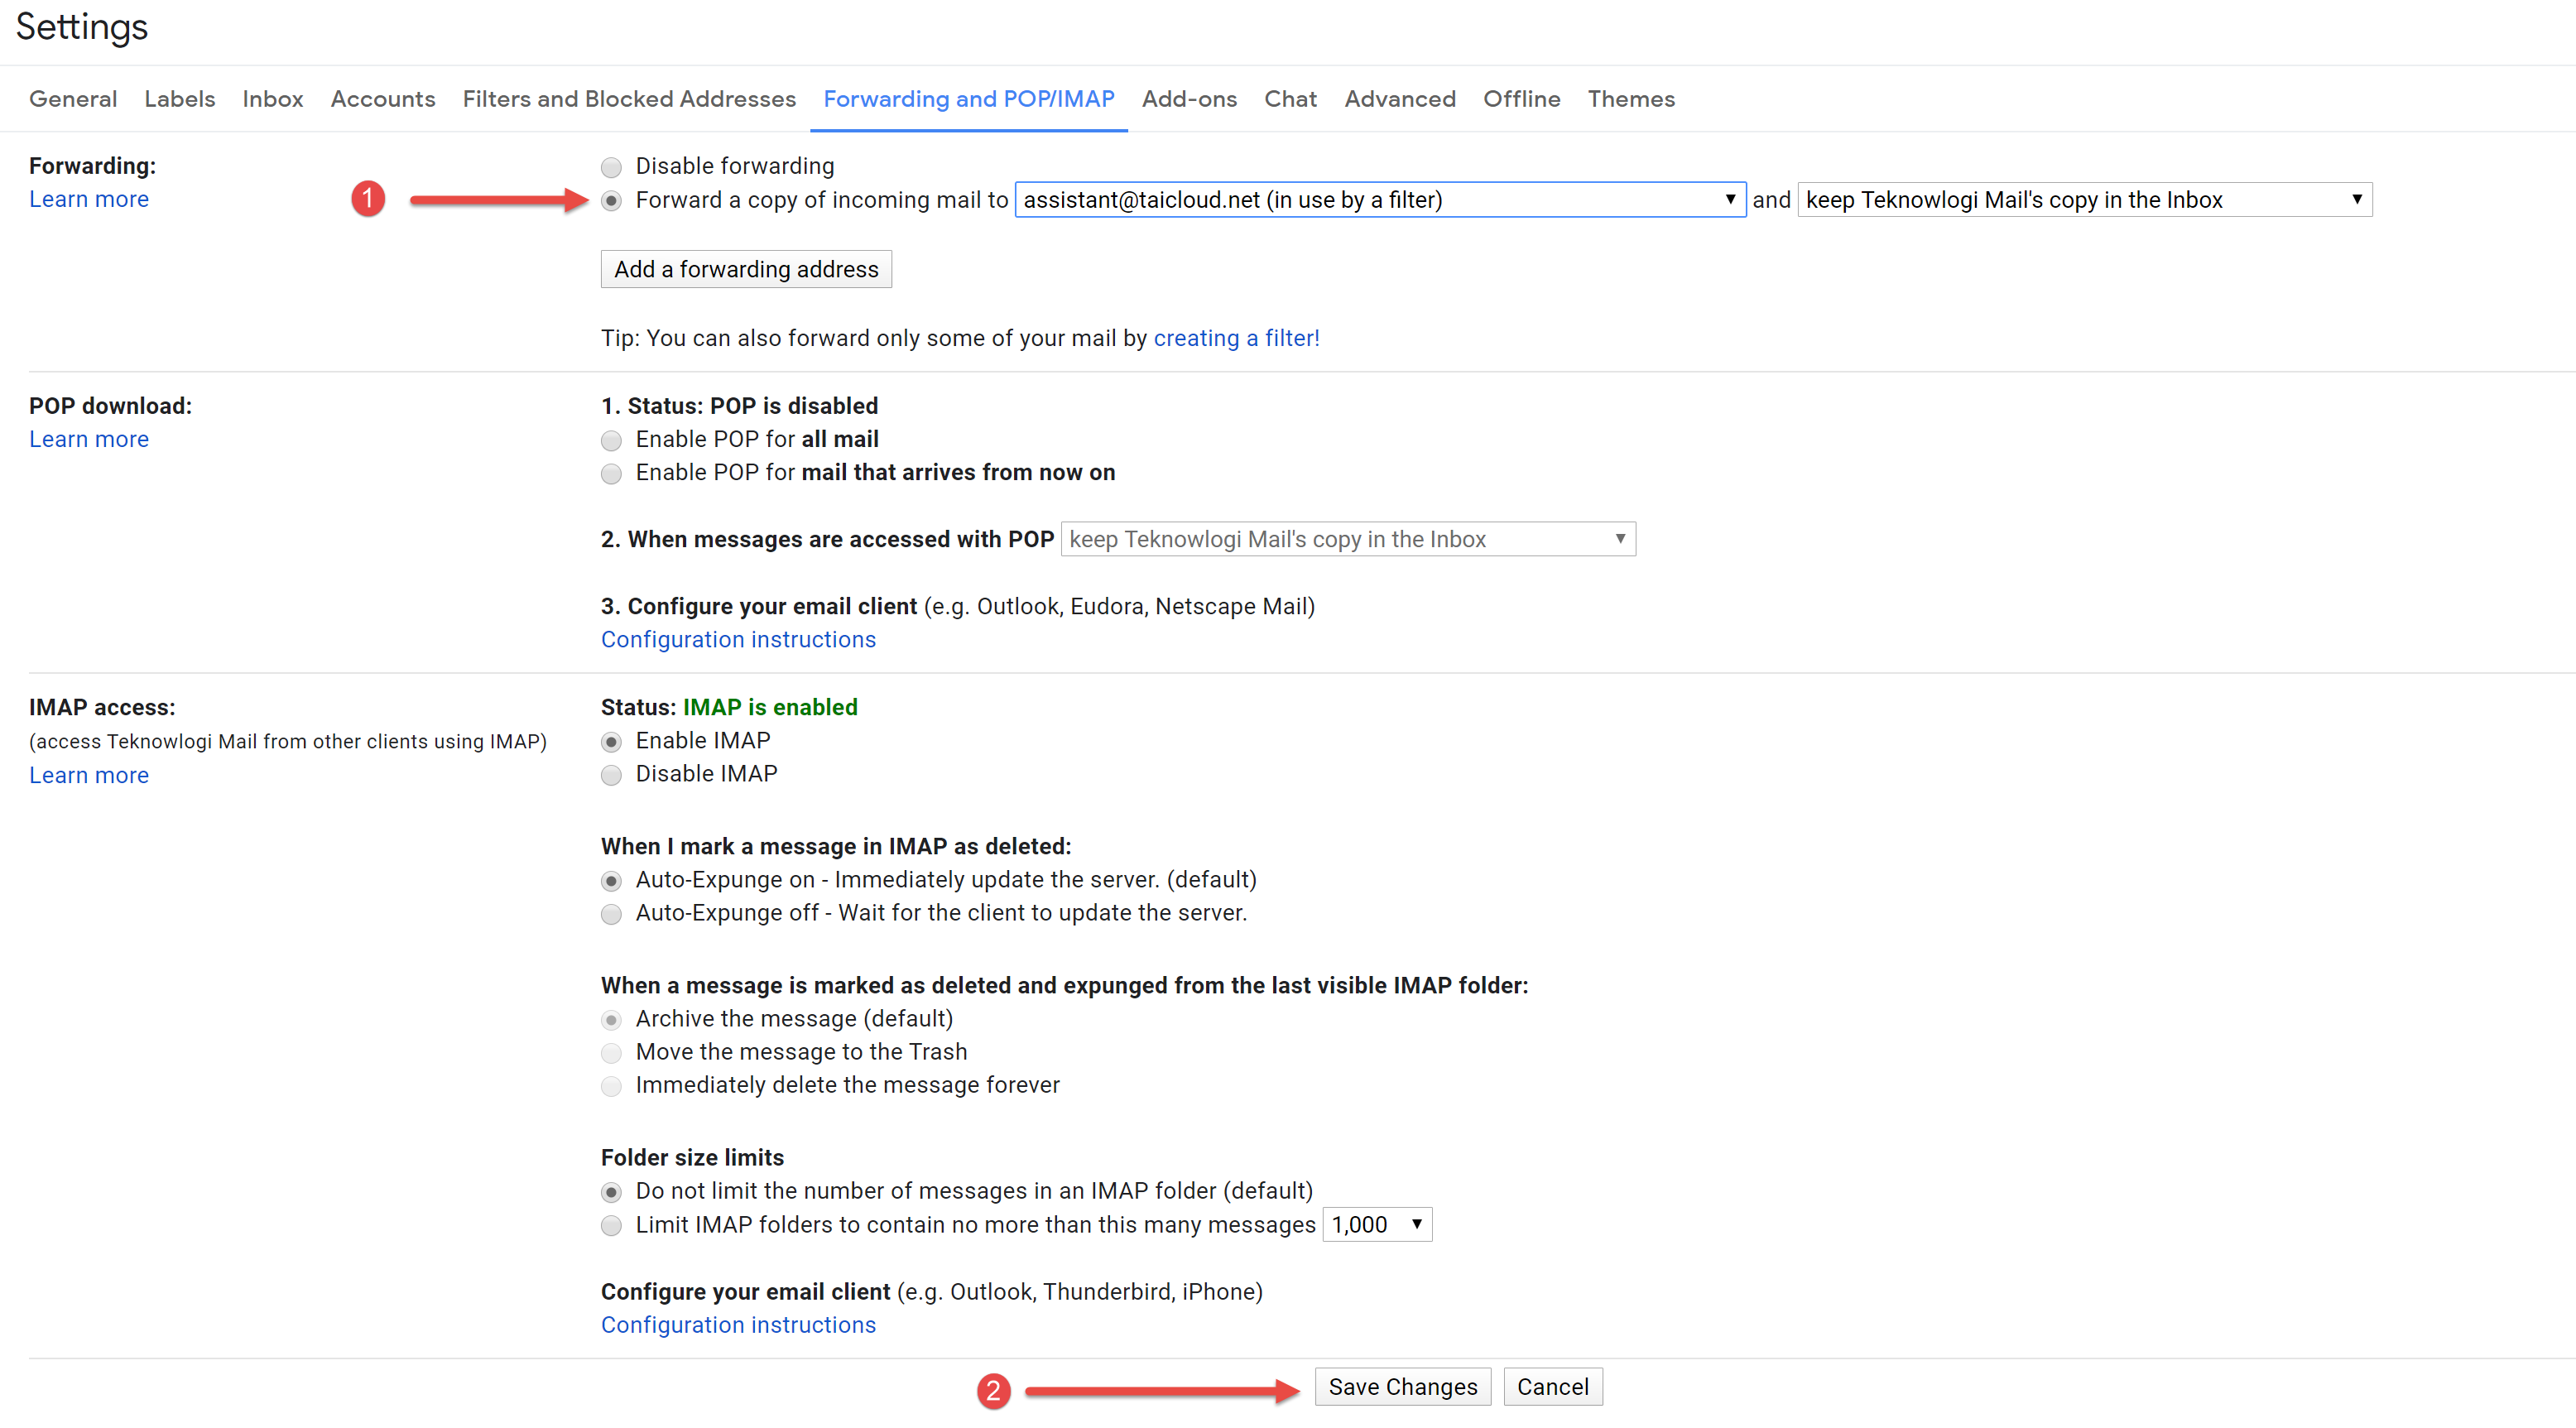
- Next, you have to set the forwarding address by clicking the radio button next to "Forward a copy of incoming mail to...." and make sure that assistant@taicloud.net is in the dropdown menu.
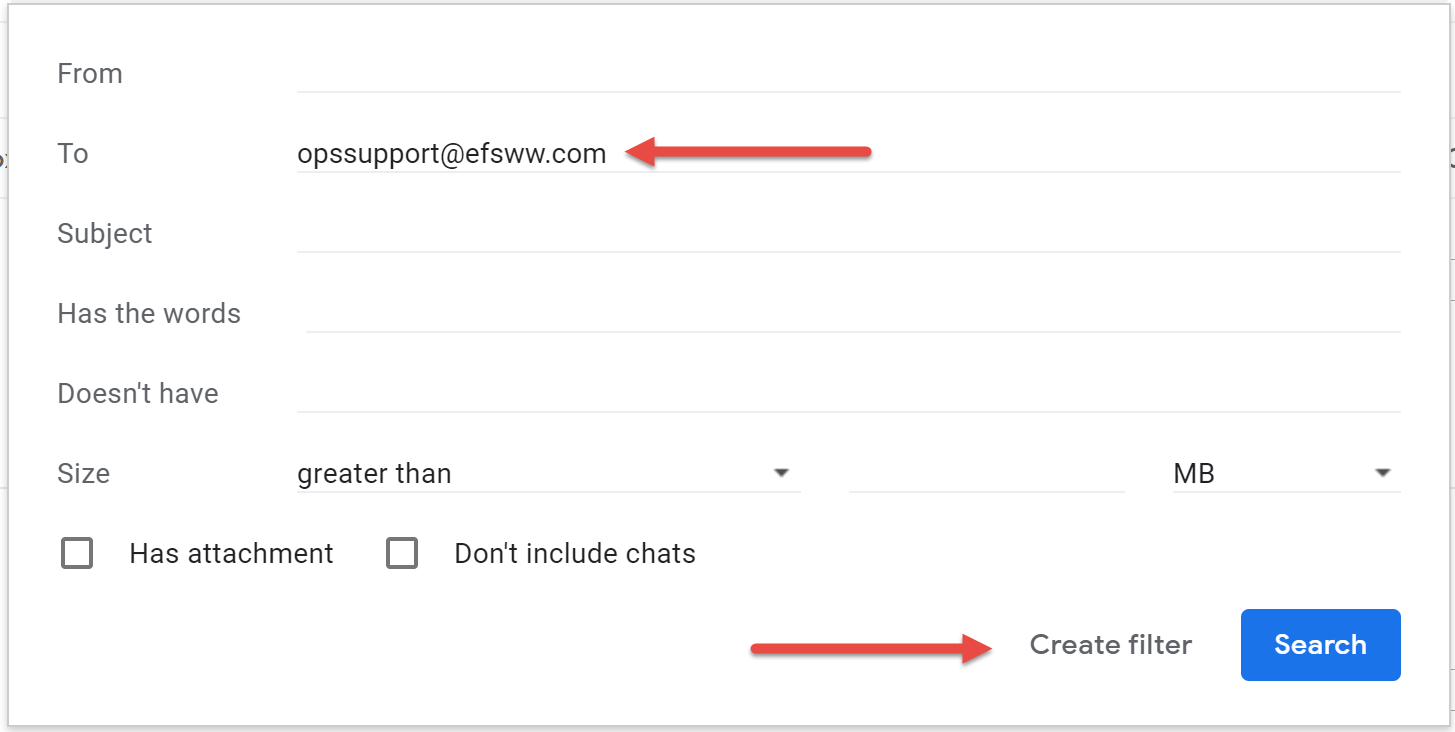
- If you already have a forwarding address you will not be able to set a second here. You'll need to click on "creating a filter!".
- To make sure you forward all emails your filter will be all emails "To" your email address.
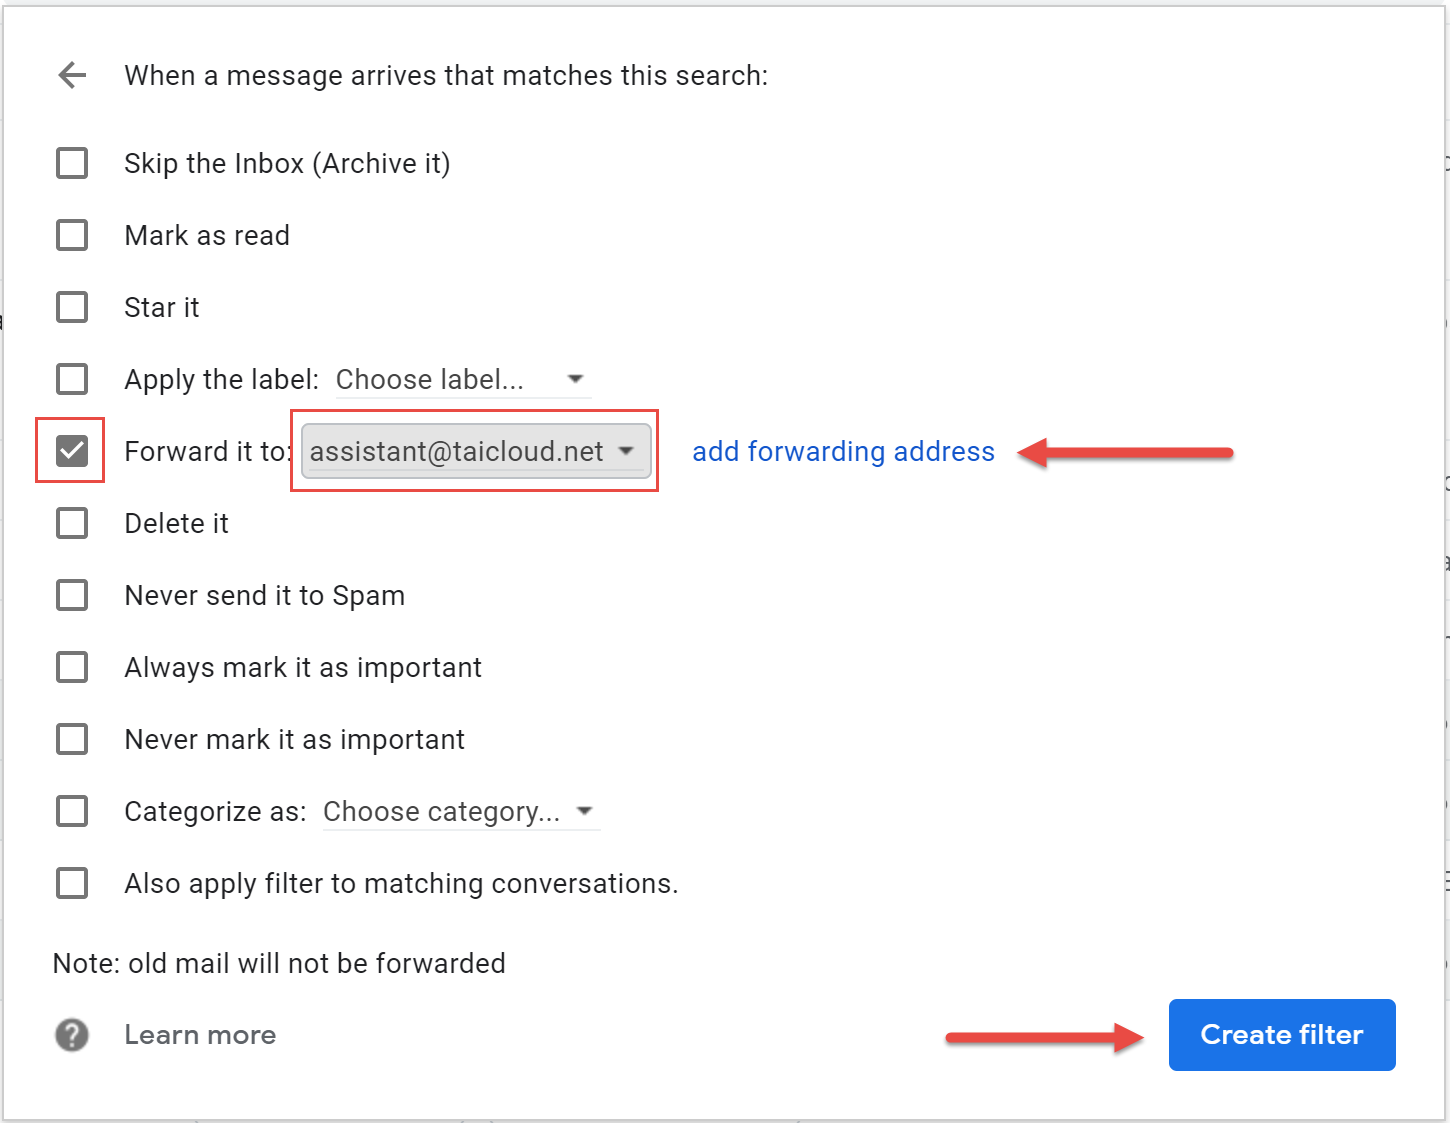
- Click on the "Create Filter" and make sure to check the box for "Forward email to.....".
- Then make sure to click the "Create Filter" button to save.

6. Tai Email Assistant Source Settings
Source Settings:
- DefaultStaffId
- The ID of the staff member who should receive all assignments by default. This can be any staff member, including a team. If this is not set, then the assignment will go to the mailbox owner or staff identified in the original email.
- Classification Overrides - each of these keys can accept an email address or a comma-separated list of email addresses. When an override email matches an email in the recipient list of the email being processed, we'll override our classification with the respective override key.
- QuoteOverride
- AttachmentOverride
- TrackingOverride
- NoAutomationOverride
-
ShipmentTypeOverride
- This field will accept a single domestic shipment type. If provided, all shipments created by Email Assistant will use this shipment type. (i.e. LTL, Truckload, Domestic Freight, Cartage, Drayage, Small Package)