This section will provide an overview of the process for approving bills for vendors within the system, detailing the different steps and procedures involved.
Accessing the Approve Bills Page
There are multiple ways to navigate to the approve bills page. Here is a list of available options:
- Shipment Details - Accounting Tab

- BackOffice - Accounting Tab

- Accounting Shipment Search: To access this option, go to the Back Office, click on the Accounting tab, and look for the Accounting Management Section.

Note: Bills can only be approved once the shipment reaches the Delivered status. Until then, the option to approve the bill will not be available on the shipment details page or in the accounting shipment search. If you try to search for the shipment in the approve bills page before it is delivered, you will not find it.
Approve Bills Page
This is the section where you can approve bills from carriers, who are usually your primary transportation providers, or bills from vendors, which are businesses you are making payments to. Vendors can include factoring companies or any entity that owns the freight bill to be settled.
This screen will show you a list of open bills to be approved:- You will check any bills to be approved and enter any bill numbers to update the bill and approve it. As well as organize the information you see (ascending or descending) by clicking on any of the columns listed.

For LTL shipments, if a bill is chosen and a PRO Number is provided, it will automatically populate as the Bill Number.
As for Truckload shipments, since they typically do not have PRO Numbers, the Shipment ID will be assigned as the default Bill Number.


How to Approve a Bill
Select the bill you wish to approve by checking the box next to it. This action will open the Bulk Operations section, where you can view the total bill amount, add the factoring company at the shipment level, and create the customer invoice simultaneously with bill approval. When you are ready to approve the bill, simply click on the "Update Bill" button.
If there are any differences in the bill prices, you can address them by marking the Variance box in the results. This will transfer the discrepancies to the Billing Variance Report for a thorough review as part of the bill approval process.
Learn more about the Billing Variance Report by clicking HERE.

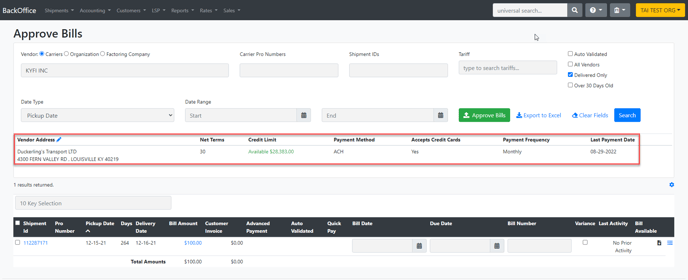
In the Approve Bills screen, we will give a full view of the carrier's accounts payable specifications so you can consider this before you approve a bill. The information displayed is what you set in the broker carrier's profile.
- Vendor Address
- Net Terms
- Credit Limit
- Payment Method
- Accepts Credit Cards
-
Payment Frequency
-
Last Payment Date

Bulk Bill Approval
When approving bills for a single vendor, you will have the option to approve bills in bulk using a downloadable template. Look for this feature as a green button located next to the Export to Excel option.

The Approve Bill Importer modal will open, allowing you to download the template and view any special instructions.

After clicking on the "Next Step" button, you will be prompted to upload the template that should include the Pro Number or Shipment Id, Bill number, and the Amount you are approving.
If the approved Bill Amount falls within the overpayment/underpayment tolerance, it will be approved with the new amount. However, if the Bill Amount exceeds this tolerance, the bill will be moved to the billing variance list for further review.
Customize Columns
In the Approve Bills screen, clicking on the gear on the right-hand side will open a modal allowing you to customize the displayed columns. With this function, a user can also reorganize the columns in the order that is best suited for their process.
Available Columns
- Carrier Rep
- Customer PO
- Destination City
- Destination Company Name
- Destination State
- Destination Zip
- Dispatcher Name
- Driver Cell
- Driver Name
- Invoiced
- Margin
- Origin City
- Origin Company Name
- Origin State
- Origin Zip
- Payer Name
- Payer Phone
- Quick Pay
- Service Level
- Shipper Reference
- Total Handling Units
- Total Weight
- Trailer Size
- Trailer Type
- Lumper Receipt
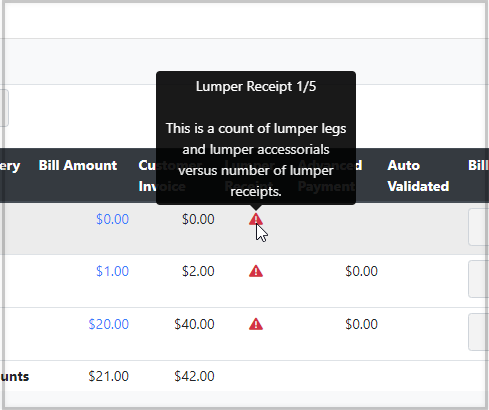
Lumper Receipt Column
By including this column, you can track shipments that require a lumper receipt. The system will alert you with a red triangle and exclamation mark if there is a lumper leg or any lumper-related charge in the shipment without a corresponding lumper receipt attached. Once this document is added, a check mark will appear in the system for confirmation.
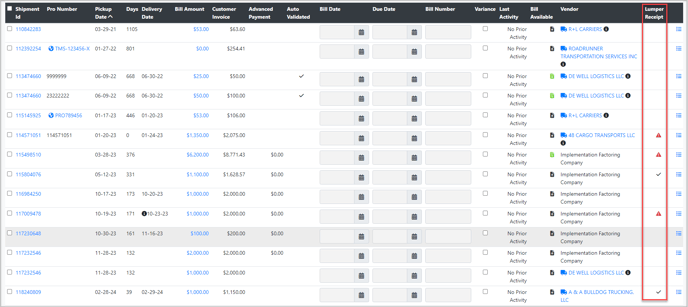
Additionally, the system will provide a count to indicate the number of attached lumper receipts, highlighting any missing receipts for shipments with multiple lumper charges and accessorials.