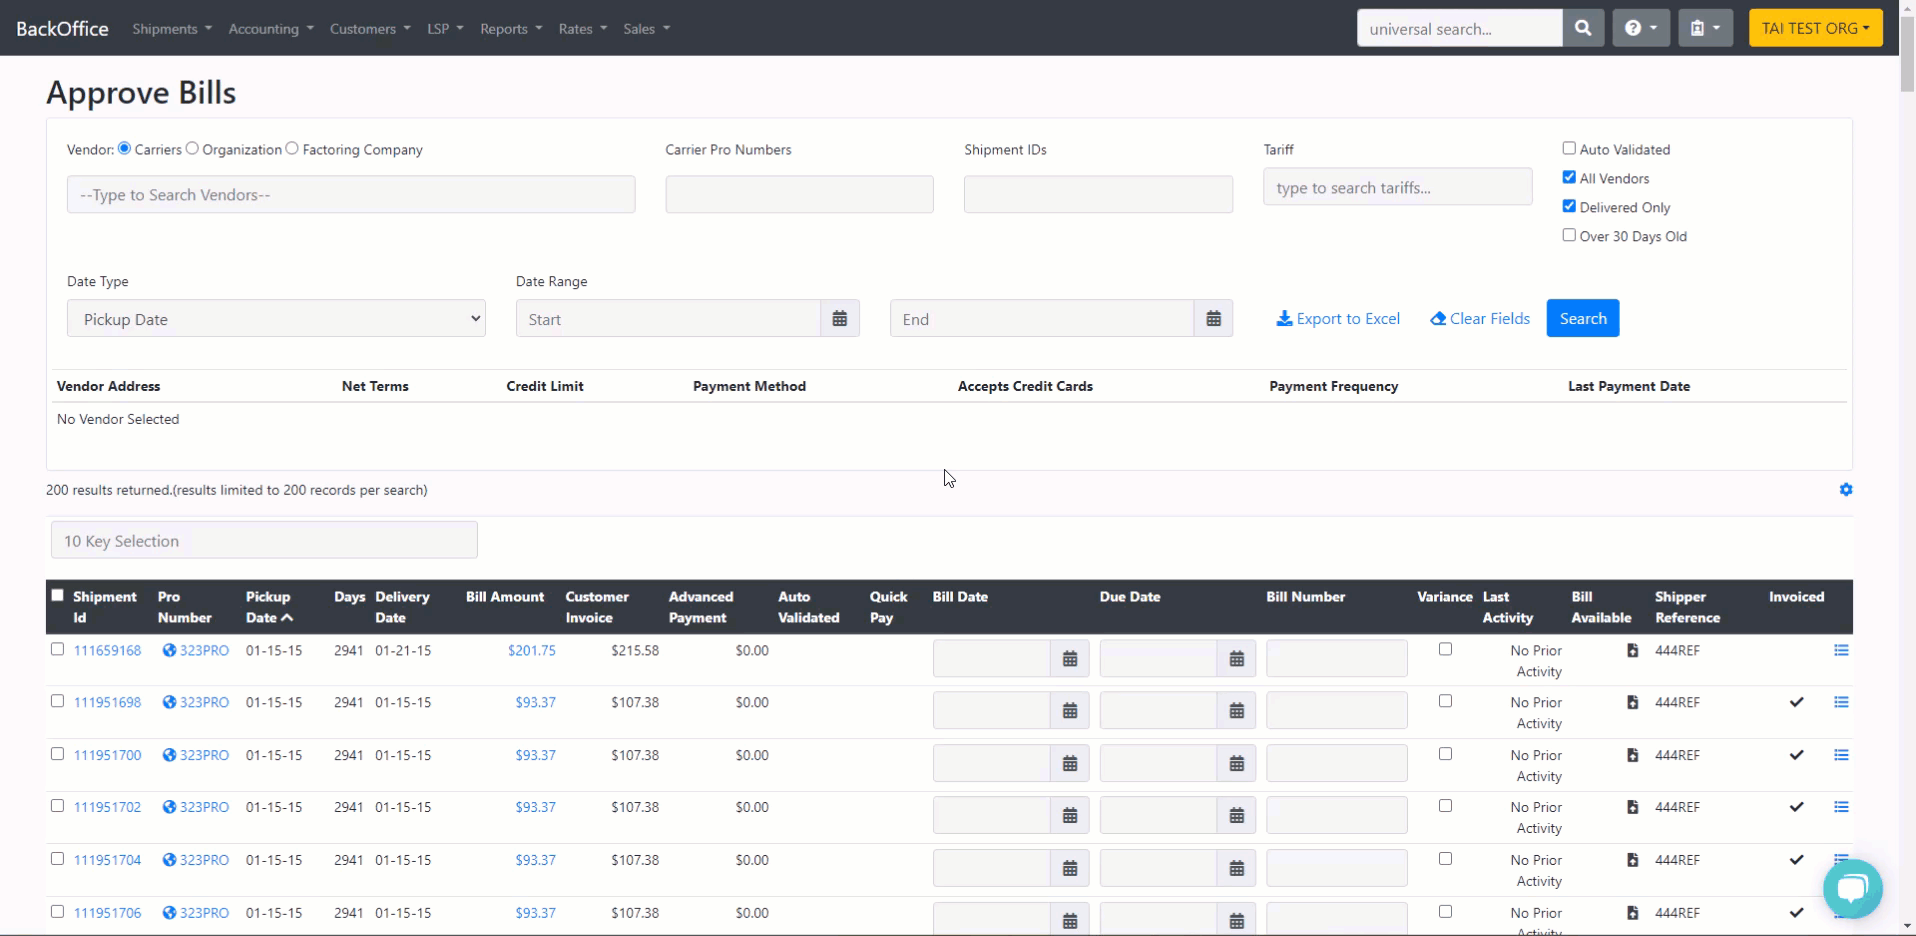
Accessing the Approve Bills Page
There are multiple ways to navigate to the approve bills page. Here is a list of available options:
- Shipment Details - Accounting Tab

- BackOffice - Accounting Tab

- Accounting Shipment Search: To access this option, go to the Back Office, click on the Accounting tab, and look for the Accounting Management Section.

Note: Bills can only be approved once the shipment reaches the Delivered status. Until then, the option to approve the bill will not be available on the shipment details page or in the accounting shipment search. If you try to search for the shipment in the approve bills page before it is delivered, you will not find it.
Approve Bills Page
This is the section where you can approve bills from carriers, who are usually your primary transportation providers, or bills from vendors, which are businesses you are making payments to. Vendors can include factoring companies or any entity that owns the freight bill to be settled.
This screen will show you a list of open bills to be approved:- You will check any bills to be approved and enter any bill numbers to update the bill and approve it. As well as organize the information you see (ascending or descending) by clicking on any of the columns listed.

For LTL shipments, if a bill is chosen and a PRO Number is provided, it will automatically populate as the Bill Number.
As for Truckload shipments, since they typically do not have PRO Numbers, the Shipment ID will be assigned as the default Bill Number.
However, the system will always prioritize the PRO Number as the Bill Number whenever one exists on the shipment, regardless of shipment type. If a PRO Number is assigned to any shipment, it will automatically populate and be used as the Bill Number.


How to Approve a Bill
Select the bill you wish to approve by checking the box next to it. This action will open the Bulk Operations section, where you can view the total bill amount, add the factoring company at the shipment level, and create the customer invoice simultaneously with bill approval. When you are ready to approve the bill, simply click on the "Update Bill" button.
If there are any differences in the bill prices, you can address them by marking the Variance box in the results. This will transfer the discrepancies to the Billing Variance Report for a thorough review as part of the bill approval process.
Learn more about the Billing Variance Report by clicking HERE.

The "Bill Available" column shows whether a document marked as "Carrier Bill" has been attached to a shipment. When this document type is present, a yellow bill icon is displayed, making it simple to sort and identify shipments with carrier bills compared to those without.

In the Approve Bills screen, we will give a full view of the carrier's accounts payable specifications so you can consider this before you approve a bill. The information displayed is what you set in the broker carrier's profile.
- Vendor Address
- Net Terms
- Credit Limit
- Payment Method
- Accepts Credit Cards
-
Payment Frequency
-
Last Payment Date


Approve Bills Bulk Import
Business Objective
- Let accounting teams approve large batches of carrier bills in a single action instead of clicking through the Approve Bills screen one row at a time.
- Support vendors who send consolidated invoicing (one file covering dozens or hundreds of shipments) by accepting a structured import rather than forcing manual data entry.
- Enforce existing controls automatically: bills that fall outside the payer’s over/underpayment tolerance are routed to the Billing Variance Report instead of being approved, so no import can bypass review.
- Provide immediate, row-level error feedback so users can correct and re-upload the file without waiting on support.
Where to find it
On the Approve Bills page, select a single vendor (Carrier, Organization, or Factoring Company). With one vendor selected, a green import button appears next to the Export to Excel option.
Template columns
Download the template from the importer modal. The file is a CSV with the following columns:
- Pro Number or Shipment ID (required). Used to locate the open bill. Matching is case-insensitive and checks Pro Number first, then Shipment ID.
- Bill Number (optional). When left blank, the system uses the Pro Number; if there is no Pro Number, it uses the Shipment ID.
- Amount (required). The amount you are approving. Must be zero or greater.
- Bill Date (optional). When left blank, the Bill Date defaults to the shipment’s pickup date.
How amounts are validated on import
- Amounts within the payer’s configured underpayment and overpayment tolerance are approved at the amount on the row.
- Default tolerances when the payer has not configured its own are $2 underpayment and $1 overpayment (applied to the difference between the imported amount and the expected buy).
- Amounts that exceed the tolerance do not fail the import; they are routed to the Billing Variance Report for manual review, so nothing is silently approved outside of policy.
Common per-row errors returned by the importer
- “No matching chargelines found for pro number or shipment id.” The shipment is not open for approval by the selected vendor, or the identifier does not exist.
- “Attempted to approve bill but bill has already been created.” The bill is already in a later status; review the shipment’s accounting tab.
- “Bill Number {value} is already assigned for this Vendor.” Bill numbers must be unique per vendor; pick a different number or clear the field to use the default.
After the import runs
- Successfully approved bills disappear from the Approve Bills list and appear on the Approved Bills Summary.
- Bills routed to variance appear on the Billing Variance Report and can be resolved, approved, or disputed from there.
- An email summary is sent to the user who ran the import with totals for approved and variance rows.
- Confirm a single vendor is selected on the Approve Bills screen before opening the importer; the button is only available in that mode.
- Verify that every Pro Number or Shipment ID in the file corresponds to a shipment that is Delivered and open for approval with that specific vendor.
- If an expected row was not approved, look for it on the Billing Variance Report; it was likely outside the tolerance and routed for review.
- Check the payer organization’s AP tolerances if too many rows are routing to variance.
- Look at the shipment’s carrier bill automation log for the exact rejection reason reported by the import.
If the column Bill Date is empty, the Bill Date will default to the Pickup Date for the shipment as the Default. Otherwise, the Bill Date will specify the Bill Date.
If the approved Bill Amount falls within the overpayment/underpayment tolerance, it will be approved with the new amount. However, if it exceeds this tolerance, the bill will be moved to the billing variance list for further review.
The Auto-Validated Column
The Auto-Validated column on the Approve Bills screen gives reviewers a quick signal that a bill still matches how the shipment was originally rated. When a checkmark appears, the bill can typically be approved without deeper review.
A bill will NOT be Auto-Validated if any of the following have changed since the shipment was rated:
- Tariff profile changed
- Origin or destination ZIP changed
- Average freight class changed by more than 11% (a 50 to 55 shift is allowed; 50 to 60 is not)
- Total weight changed by more than 20 lbs
- Current margin differs from the original margin by more than $0.50
Additional conditions:
- Both current sell and current buy must be greater than zero.
- The carrier’s invoice amount must match the payer’s buy within $0.50.
- Only Truckload, LTL, and Drayage shipments are eligible. International Air, International Ocean, Cartage, Small Package, and other shipment types are excluded by design.
The checkmark is display-only. It does not approve the bill on its own. Reviewers still need to check the bill and click Update Bill to complete approval.
Customize Columns
In the Approve Bills screen, clicking on the gear on the right-hand side will open a modal allowing you to customize the displayed columns. With this function, a user can also reorganize the columns in the order that is best suited for their process.
Available Columns
- Carrier Rep
- Customer PO
- Destination City
- Destination Company Name
- Destination State
- Destination Zip
- Dispatcher Name
- Driver Cell
- Driver Name
- Invoiced
- Margin
- Origin City
- Origin Company Name
- Origin State
- Origin Zip
- Payer Name
- Payer Phone
- Quick Pay
- Service Level
- Shipper Reference
- Total Handling Units
- Total Weight
- Trailer Size
- Trailer Type
- Lumper Receipt
Automatic Bill Approval
Bills can also be approved automatically with no user action required when they arrive through one of the following channels:
- EDI 210 inbound carrier invoices. See https://learn.tai-software.com/knowledge/edi-210-automation-process for setup.
- HubTran integration.
- Approve Bills bulk import. The Excel template on this page. See the Bulk Bill Approval section below.
- EPay Manager. See https://learn.tai-software.com/knowledge/epay-manager.
- Document Processor (OCR of carrier bill PDFs).
When auto-approval succeeds, the bill is marked Approved and a note is written to the shipment activity log. When it fails validation, the bill is moved to the Billing Variance Report for manual review rather than being silently rejected. The automation source is tagged on every entry in the shipment’s carrier bill automation log, making it easy to tell user-approved bills apart from EDI, OCR, or bulk-import approvals.
Troubleshooting: why a bill did not auto-approve or is not Auto-Validated
- Confirm the shipment is in Delivered status.
- Confirm the carrier on the bill matches the vendor on the shipment transit leg.
- Confirm a rating history exists on the shipment and that the tariff, ZIPs, freight class (within 11%), and weight (within 20 lbs) have not been edited after rating.
- Confirm current sell and current buy are both greater than zero and that vendor sell matches the payer’s buy within $0.50.
- Confirm original margin and current margin match within $0.50.
- Confirm the shipment type is eligible (Truckload, LTL, or Drayage).
- Review the shipment activity log and the carrier bill automation log for the rejection reason from the source integration.
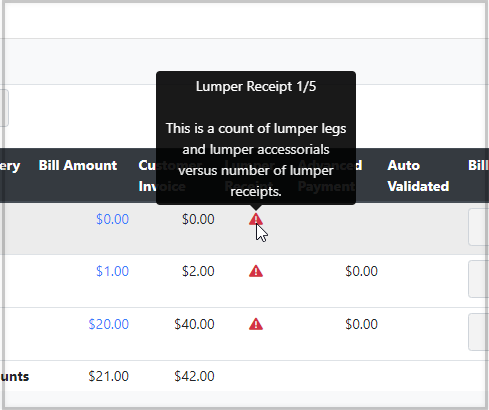
Lumper Receipt Column
By including this column, you can track shipments that require a lumper receipt. The system will alert you with a red triangle and exclamation mark if there is a lumper leg or any lumper-related charge in the shipment without a corresponding lumper receipt attached. Once this document is added, a check mark will appear in the system for confirmation.

Additionally, the system will provide a count to indicate the number of attached lumper receipts, highlighting any missing receipts for shipments with multiple lumper charges and accessorials.