For the video tutorial, click here
Introduction
Table of Contents:
- Connecting to Sync
- Setting up AR Connection
- Setting up AP connection Payables
- Setting Up GL Accounts
- Syncing Vendors
- Syncing Carriers
- Processing Fees on Bill Payments
- Troubleshooting
- Register ACH Payments
- Factoring Companies
- QuickBooks Online Additional Settings
Connecting to the Sync
Note: If you have a custom domain, ensure you are using your tai-branded site prior to doing the below steps. (e.g. ABCBroker.taicloud.net)
Click Accounting on the Top Menu, then Accounting Sync. Once you're on the QuickBooks Sync Page, press the Connect to QuickBooks button on the bottom. 
If you are currently connected, select the yellow "Disconnect from QuickBooks button and then follow the steps from above.
You will then be redirected to a QuickBooks portal prompting for your login information.
Afterwards, you will see a prompt to connect to the Tai Software TMS. Click the green "Connect" button and finalize the remaining steps. 
Important: An account with Administrative permissions in QuickBooks must be used for this process. If not, you will receive a message such as the one below: -png.png?width=665&height=329&name=image%20(32)-png.png)
Once you have done this process you will need to click on the Test connection button on the top and the Test Connection button located at the bottom of the screen in blue:
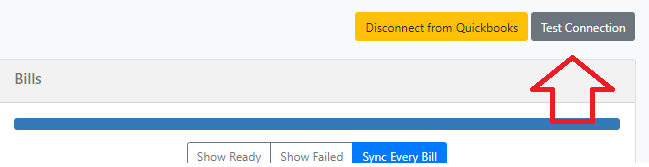

Once you do this the system will give a confirmation if the test connection was done successfully.
***Note: Have in mind that the QuickBooks tokens expire every month and this connection process needs to be done to refresh them an keep your account connected to sync***
Setting up AR Connection
To have your AR sync over to QuickBooks Online, you must set up a code in your Products and Services Section in your QuickBooks Online to enable your AR to sync over properly. Click the Gear Icon on the top sight and click Products and Services. You will be setting up a code called TRANS. It will allow your invoices and invoice payments to sync over. Select New on the top right and select Service. Type in "TRANS" in the Name section and make sure that Income Account is set to Sales. You will need to have a sales account in your income account section.
Setting up AP connection Payables
To have your AP sync over to QuickBooks Online, click the Gear Icon on the top sight and click Chart of Accounts. Select New on the top right and select Cost of Goods Sold as the Account Type and "Freight COS" as the Name. Make sure that the spelling and casing match exactly. You will need to have an Accounts Payable account set up and it will need to be spelled "Accounts Payable," NOT "Accounts Payable (A/P)."
Setting up GL Accounts
If you want your entries to be sent over to specific GL Accounts other than the defaults in QBO, you'll need to set them up and add filters.
The Account Code in Tai needs to match the Account Name in QBO.
Each GL Account needs to have at minimum, one filter. Ex. Shipment Type, Transit Leg, Charges, Accessorial.
AR Example: 
QBO Setup.
Note, AR GL accounts must first be created under the Services Section in QBO.
Sales > Products and Services


AP Example: 
QBO Setup under Chart of Accounts: 
Bank Account: 

Syncing Vendors
Syncing any Bills will automatically sync the Vendor. If the Vendor is a Marketplace Organization or Factoring Organization, we'll proactively update the Address Information listed for the Carrier.
Syncing Carriers
Syncing any Bills will automatically sync the Carrier as a Vendor. Terms will be displayed based on the Payment Terms set up within the Broker Carrier Profile. If a Remit To Address is listed, the Address information is created within QuickBooks under the Print To Check field.
Processing Fees on Bill Payments
Processing fees on Bill Payments, such as credit card fees or QuickPay discounts, are included in the accounting sync to ensure that the total amount paid to a vendor matches what appears in QuickBooks Online.
Processing Fees Are Represented in QuickBooks Online in the following way:
Separate Bill for the Processing Fee
- When a Bill Payment includes a processing fee, the fee is sent to QuickBooks Online as a separate Bill.
- This keeps the original vendor Bill and the processing fee distinct for cleaner reporting and easier reconciliation.
For processing fees to be included in the sync, both a Debit and a Credit GL Account must be configured. If either one is missing, the Bill Payment cannot sync successfully.
An appropriate Expense account in QuickBooks Online must also be available and mapped for processing fees. If no Expense account is set up for this purpose, the Bill Payment will also fail to sync.

Linked to the Bill Payment
The processing fee Bill is linked to the vendor’s Bill Payment in QuickBooks, so the total payment amount reflects both the original Bill and the cost.
Example:
If a $200 Bill has a $10 processing fee, the payment in QuickBooks appears as a single $210 payment linked to:
-
The original $200 Bill
-
The separate $10 fee Bill
When a Fee Is Not Included
A processing fee is not included in the sync when:
-
The fee amount is $0, or
-
The fee is removed from the Bill Payment
In these situations, only the Bill Payment information is sent.
How Processing Fees Are Categorized
Processing fees use the Expense account selected in accounting settings.
This ensures the fee is categorized correctly, whether it increases or reduces the payment amount.
Troubleshooting
Bills
A sync failure can occur if:
- The Bill Number exceeds I think it's 21 characters.
- The Accounting Period is over
- A Bill Already exists for that vendor with the same Bill Number
Bill Payments
There are some scenarios that may cause a Bill Payment to fail to sync:
1. It was unable to locate the Bill for the Shipment. (Occasionally when multiple Bills are on a single payment the likely hood that one shipment bill did not sync over could happen)
2. A payment was already manually applied in Quickbooks to the shipment. (We can't apply a second payment as it would issue an overpayment)
3. The Accounting Period has already passed. Quickbooks has this weird thing where you can enter in manual payments still, but syncing isn't allowed if the Accounting Period has passed. When this occurs you'll need to take a few extra steps to clear this up. Essentially you'd have to create a manual payment in Quickbooks for the Bill, then you'd come to our TMS and go to Accounting -> Accounting Sync History, and search up the Bill Payment that's pending and mark this as Complete. This will then pretend that we already synced it to Quickbooks so it won't appear in the Accounting Sync Page.
Register ACH Payments
Quickbooks does not manage an ACH type on their platform so all the payments you sync over that were registered on the TAI TMS as ACH type will be reflected on Quickbooks as Bill Payment (Check) or Check. To avoid affecting your workflows whenever syncing and printing checks you need to follow the next steps:
1. Go to the Accounting Sync page and under the bills portion click show ready, this will show the list of bills that are ready to be synced.
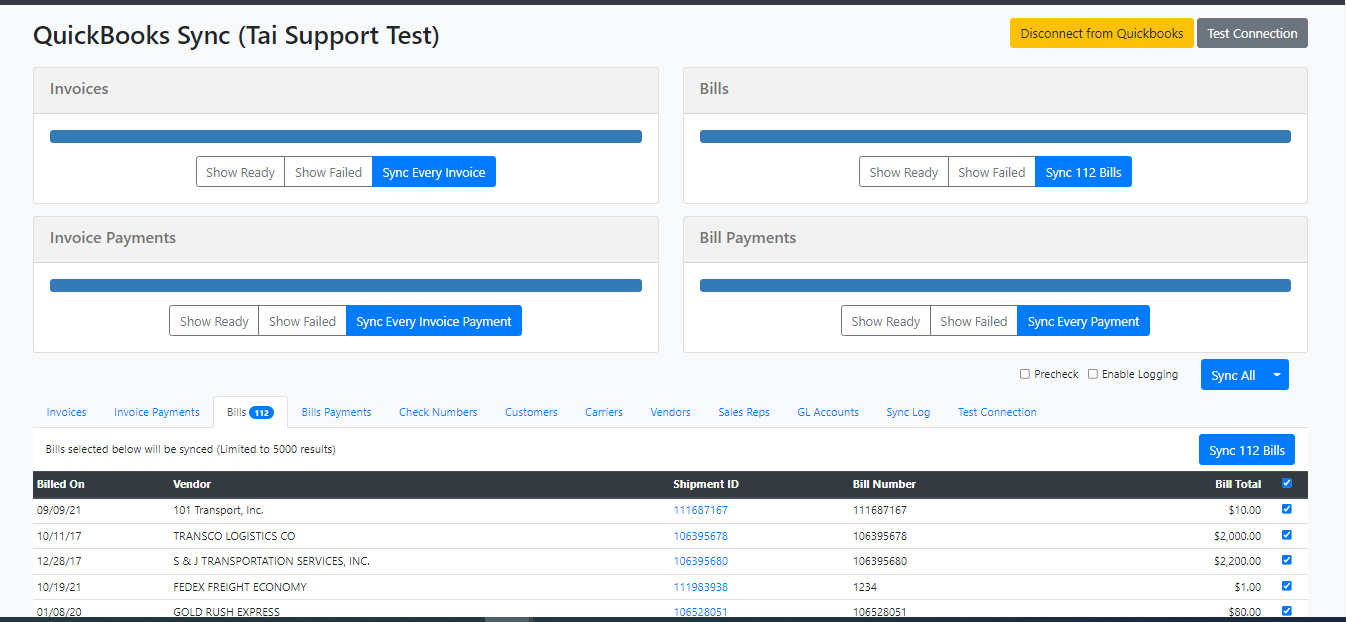
2. Select the ACH payments and sync those first to Quickbooks.
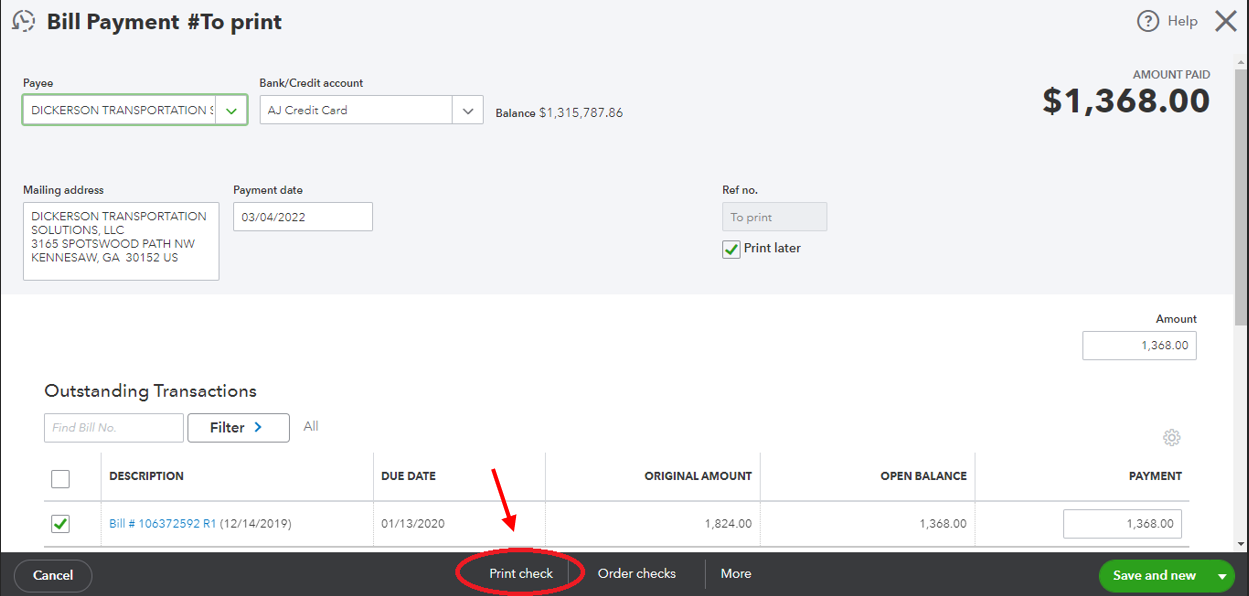
3. Go to Quickbooks and access those Bills that were synced. Click on the button on the bottom of the page that says Print Check.
4. Select the Bill payments you just synced and select the remove from list option.
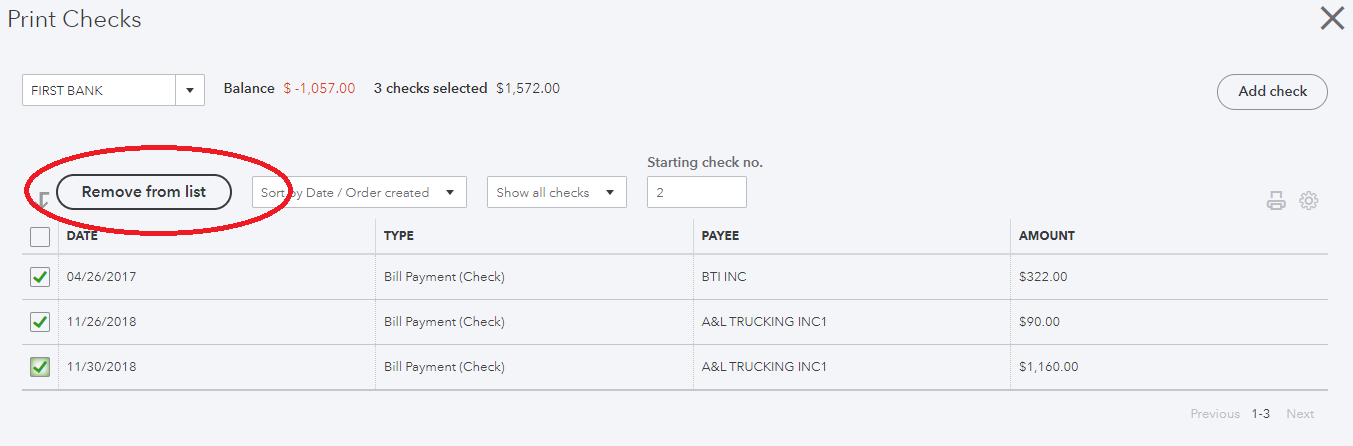
5. This will remove these payments from your check list and those will not be printed, but the payments will remain registered on Quickbooks.
6. Proceed to sync the remaining payments that are Checks and need to be printed.
Factoring Companies
Different scenarios to where we can sync Factoring Companies:
1. Sending over just the Address to Print a Check from Quickbooks. (When you want the Vendor to display as the Carrier but the Payment to be printed out to the Factoring Company, then an adjustment will have to be made on the LSP Carrier Profile under the Remit to field. The address listed there will carry over to the Vendor Profile in Quickbooks)
2. Factoring Company as a Vendor. (Following our workflow, Factoring Companies are considered Vendors. This, in turn, creates a Vendor in Quickbooks that gets created to run reports directly against the Vendor as opposed to the Carrier. This report allows you to see how much you may be paying the Vendor specifically as opposed to the Carrier themselves)
Quickbooks Online Additional Settings:
To add the following, you will need to create an integration source called Quick Books Online
Plus
- This feature will associate the Customer IDs with a Project for any Bills synced to QuickBooks Online, enabling users to easily track which AR corresponds to each AP.
- The values accepted are True or False
- False by default

This feature is only available for users with a Plus subscription to QuickBooks Online.
Class
- When managing multiple office locations, you may want to track the activities and transactions of each office separately within QuickBooks Online.
- This feature is compatible with any reference number.
- Blank by default
- This will add a Classification for each Transaction Record for Invoices and Bills.
- If a Class does not exist or match the Reference Number specified, a New Class will be created.

This feature is available only with a Pro or Advanced subscription plan for QuickBooks Online.
Class Example in QBO: 