Overview:
This article will help you configure the Front Application Objects, these objects must be configured within your Front Application. We've tried to make this as easy as possible by providing a step-by-step, Tai-specific, tutorial.
Setup Steps
- Get API Key in Tai
- Create an Application Object in Front
- Add Details to your Application Object in Front
- Sample Payload Data
Get API Key in Tai
Before you get started in Front, create a new Public Authentication Key in the TMS. You can do this by navigating to LSP and then selecting Public Authentication Keys.

- Click on the green "Add Public Authentication Key" button in the top right corner of the page.
- Choose your LSP Organization.
- Choose a LSP Staff that they key will be associated with. This will determine the shipment visibility of your requests so this should likely be someone with access to all of your customers and shipments.
- Click the blue "Save" button in the lower right corner of the modal to create your key.

After creating your key you should see a record on the "Public Authentication Keys" results table. You can click on the "copy" icon to the right to copy the API Key to your clipboard. Next you'll move over to Front.
Create an Application Object in Front
Next you'll access your Front account with administrative privileges. Start by logging in to https://app.frontapp.com/ and performing the following steps.
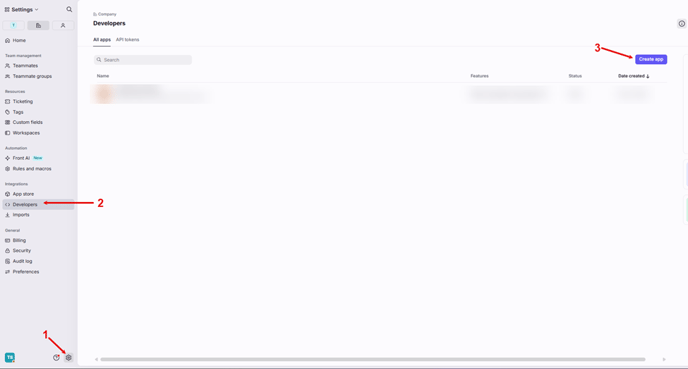
- Click the settings icon in the bottom left corner of the page
- Then click "Developers" on the left side navigation.
- Next click the blue "Create app" button on the right hand side of the screen.
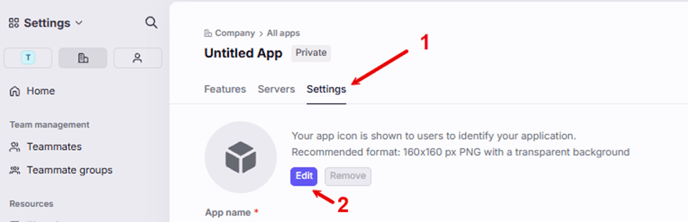
- On the new app modal, click on Settings
- Click the blue "Edit" button next to the blank icon to add an image to your application. We recommend using the following Tai PNG which can be saved by right clicking on the image below.
-png.png?width=160&height=160&name=front-tai-logo%20(1)-png.png)
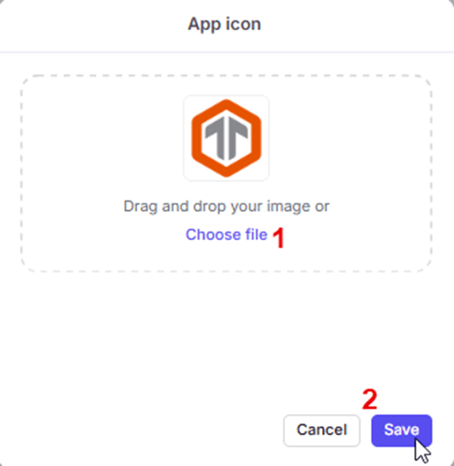
- Click the blue "Choose file" link to open up your file explorer and choose the image you saved from above (or another of your choosing).
- Next click the blue "Save" button in the lower right of the modal to update the image for your app.
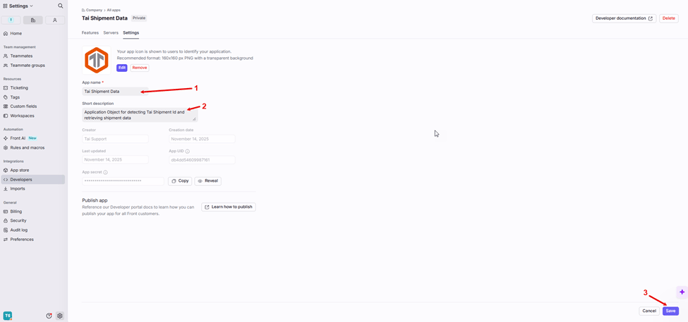
- Proceed by naming your app. We recommend using "Tai Shipment Data" since this app will be used to show shipment information associated to shipment ids found in your messages.
- Add a short description. We recommend "Application Object for detecting Tai Shipment Id and retrieving shipment data.".
- Click on the blue Save button to save the changes.
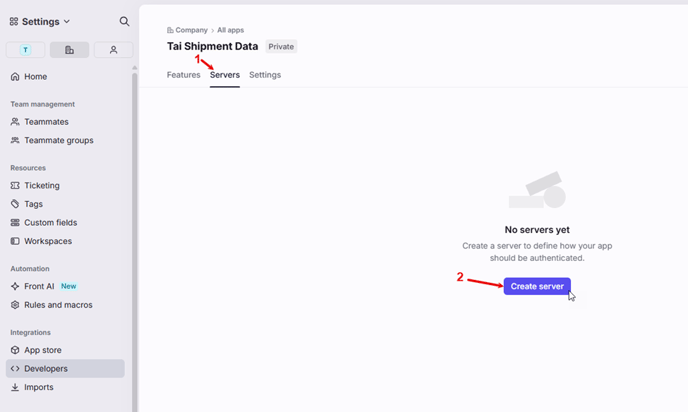
- Now, Click on the "Servers" tab.
- Then click the blue "Create server" button in the middle of the page.
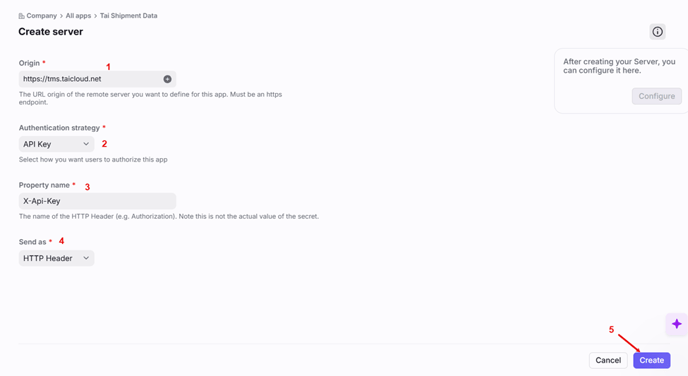
- Begin creating your server by adding the "Origin". You can use a custom domain here if you'd like but we recommend sticking with "https://tms.taicloud.net".
- Set the "Authentication strategy" to use "API Key" in the dropdown.
- Our property name needs to be set to "X-Api-Key".
- For the "Send as" you'll choose the default of "HTTP Header".
- Click the blue "Create" button in the lower right corner to continue.
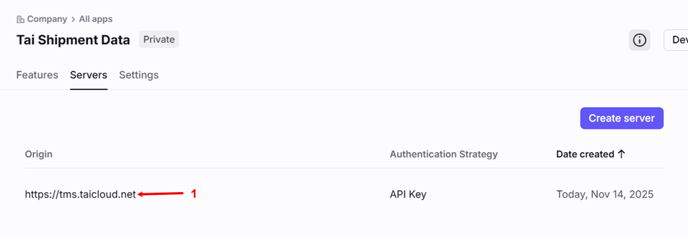
- After the server is saved you'll need to click the link to get back into the newly created server. From here you can add your API Key from the TMS that you created earlier.
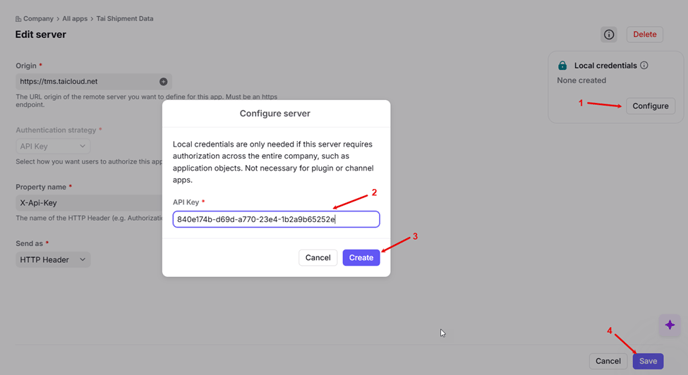
- Click the "Configure" button on the right side of the page under "Local credentials".
- Paste in the API Key that you created in the TMS.
- Click the blue "Create" button in the lower right of the modal.
- Click on the blue “Save” button in the lower right of the page.

- Next, click into the “Features” tab
- Then click on the blue “Add feature” button
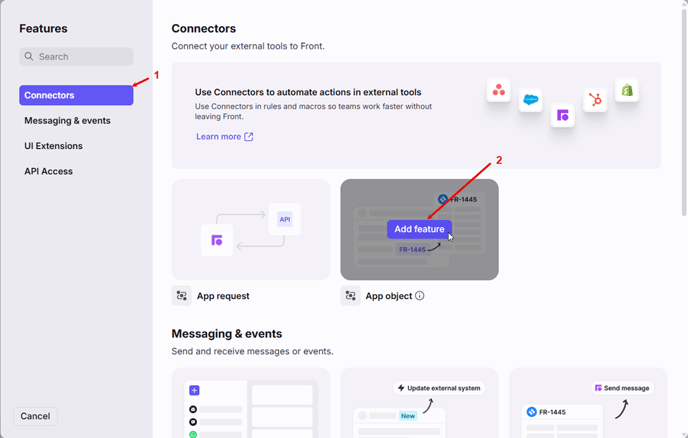
- Select the “Connectors” option on the left navigation modal
- Click on the blue “Add Feature” above “App object”
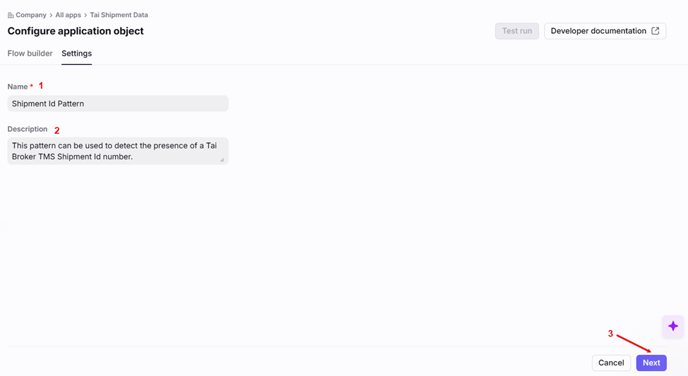
- Add a name. We recommend using "Shipment Id Pattern" but anything will work.
- Add a description that explains what this object is doing. We recommend using "This pattern can be used to detect the presence of a Tai Broker TMS Shipment Id number."
- Click on the blue “Next” button on the bottom right hand side of the modal.
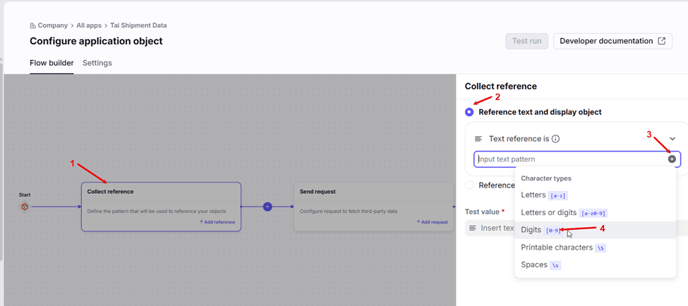
- Click on the “Collect reference” rectangle
- Select “Reference text and display object”
- Click on the + icon to display the options available
- Select “Digits [0-9]” as your text reference.
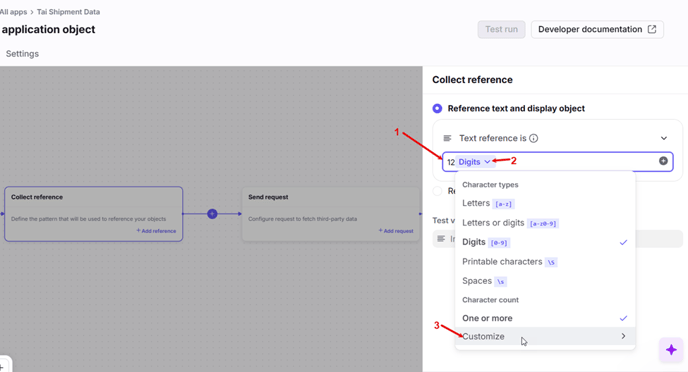
- Next add a "12" by typing in front of your selected "Digits" pattern.
- Then click the down arrow next to “Digits” to open up the Character count dropdown.
- Click on “Customize”
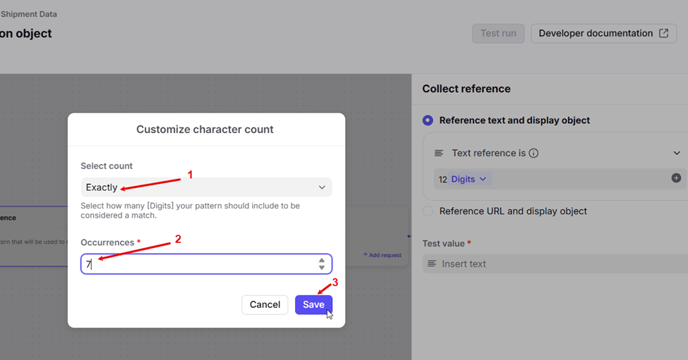
- In the Customize character count modal choose "Exactly".
- In the number of Occurrences enter "7".
- Then click the blue "Save" button in the lower right of the modal.
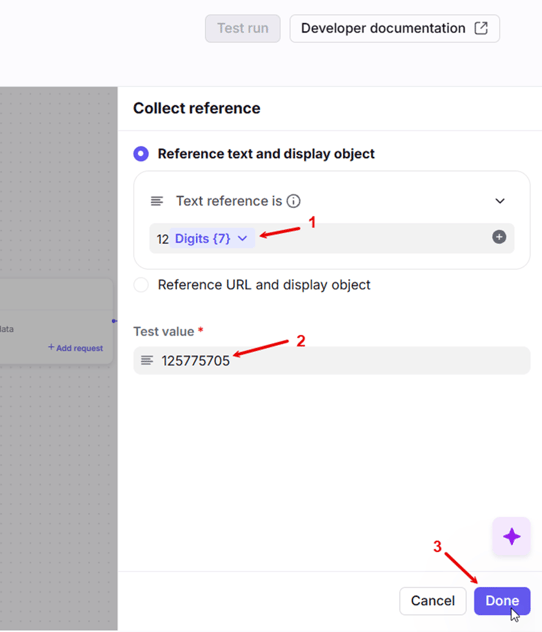
- Your final pattern should look like this.
- In the “Test Value” field enter a shipment ID for your company, this will later be used to test the app.
- Click on the blue “Done” button.

- Now to create our request, click on the “Send Request” rectangle.
- Click on the Drop down arrow under the URL field
- Select the URL previously used when creating the server, in this example we have “https://tms.taicloud.net”
Next we'll add the API endpoint we want to use to end of our URL. In this case we are looking for shipment data so we're going to use the GET Shipments API. The endpoint we'll add here is "PublicApi/Shipping/v2/Shipments/12" and at the very end we'll add our "Digits{7}" pattern we created previously.
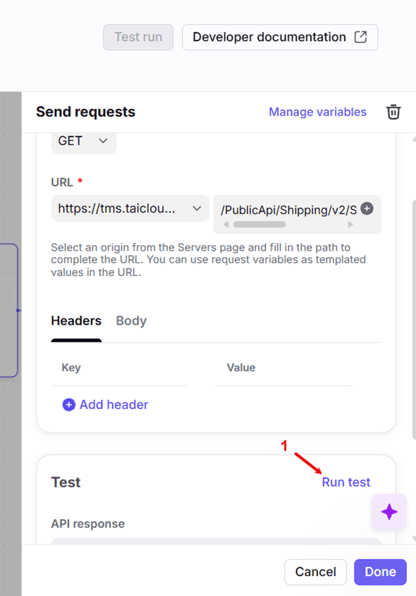
- Now we will test if the request is being sent correctly. Click on the “Run Test” text, which should return a response such as the below with green items.
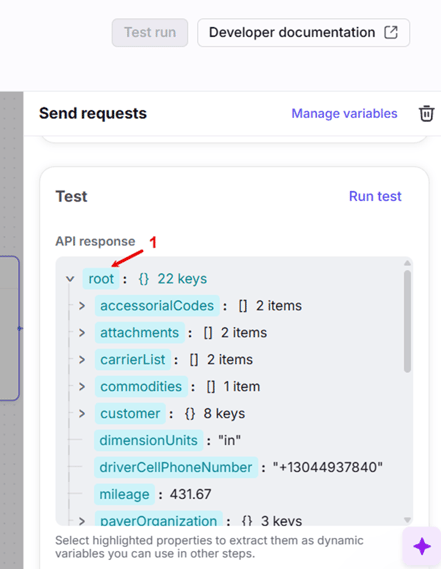
- Now we will proceed to create Dynamic variable which can be later used to extract more information out of the request. To do this, click on the “root” rectangle
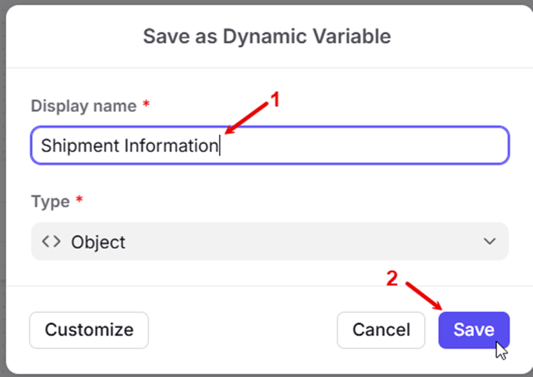
- Under Display Name enter “Shipment Information”
- Click on the blue “Save” button.

- The dynamic variable we just created will appear as an Extracted property
- Click on the blue “Done” button to save all progress.
- Now we will configure the return data, click on the “Return Data” rectangle.
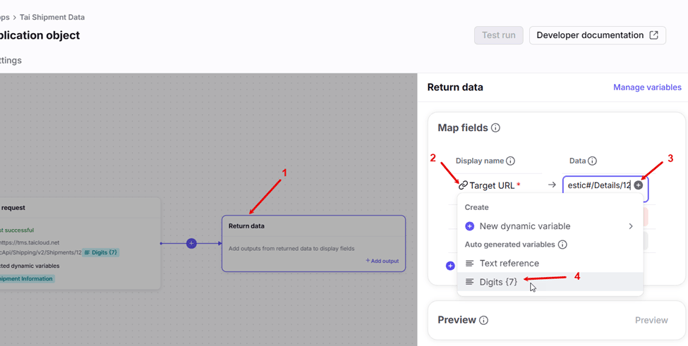
- Starting with the Target URL field, this is a redirect URL that a user can visit by clicking on your application object in their message. In this case, we'd like the user to be redirected to the Shipment Detail Page in the TMS of the identified shipment Id. Our Target URL should be "https://tms.taicloud.net/BackOffice/ShipmentDomestic#/Details/12" without the quotation marks
- After the URL has been added, click on the + icon next to the data field
- Select Digits (7) to be added at the end of the URL we pasted in step 2.
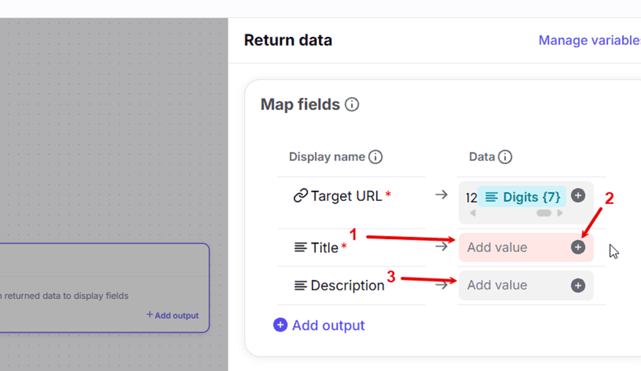
- The Title should be "Shipment Id: 12" without the quotation marks
- Select the plus icon to add the Digits {7} pattern from earlier at the end.
- The Description should be "A Shipment Id has been detected." or something similar.
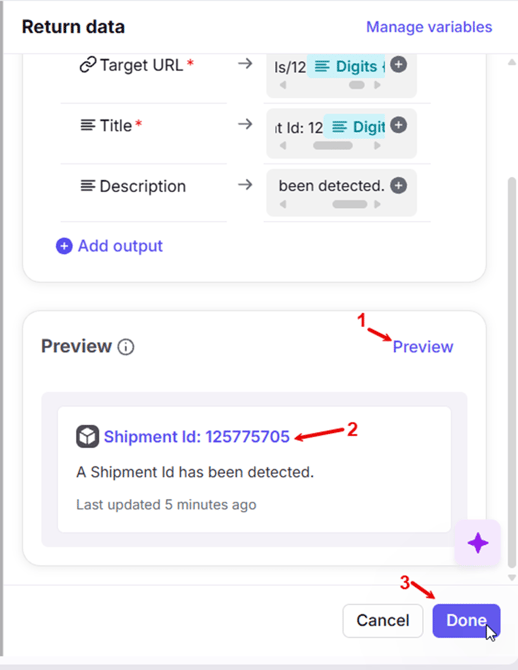
- After all required fields have been filled out, click on Preview to test the return data
- A link will be generated which will take you to Tai TMS page as an example to show you how it will behave.
- Click on the blue “Done” button to save all changes.
Note: You would need to login under https://tms.taicloud.net/ for the link to take you directly to the shipment details page.
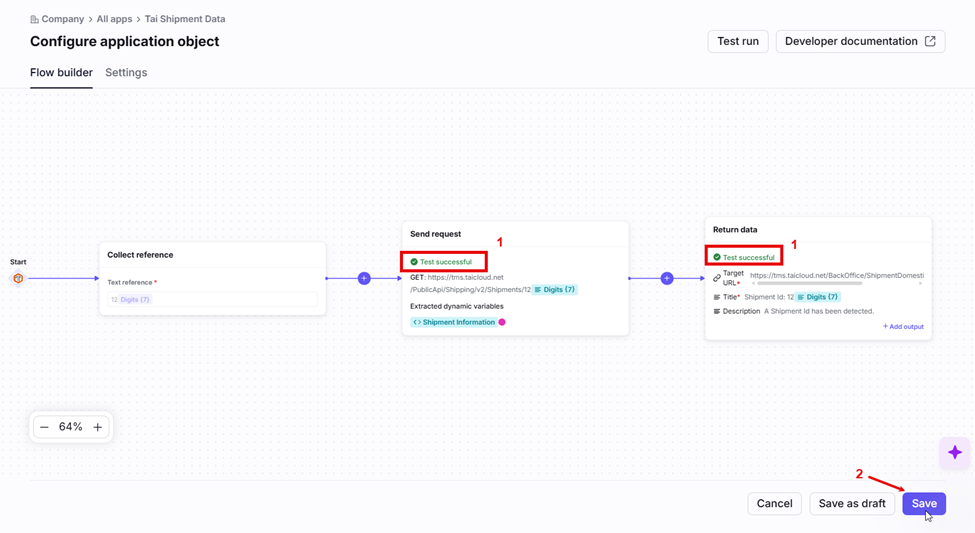
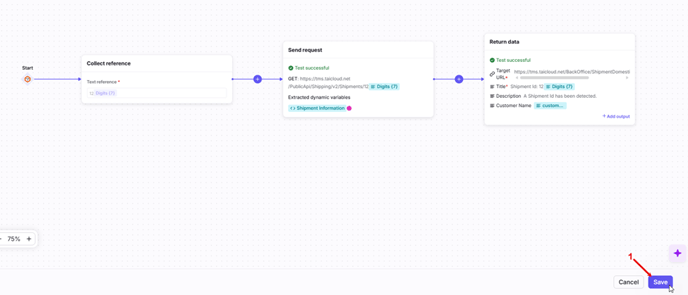
- After the previous steps, you should be seeing 2 Test successful messages under the send request and Return data rectangles.
- Click on the blue “Save” button on the bottom right to save all progress.
This object is fully configured and working but we'd like to make it more useful by extracting additional data fields. Please use the section below about adding more details to your Application Object.
Add Details to your Application Object in Front
To begin adding details you should first glance over the sample payload data below. You'll have access to any of the data you see in this payload by configuring your app to access the specific properties you would like to display. For our example we'll add a few common properties including:
- Customer Name
- Shipment Type
- Status
- Carrier Name
You can use the foundations learned in these examples to add any additional properties that you need.
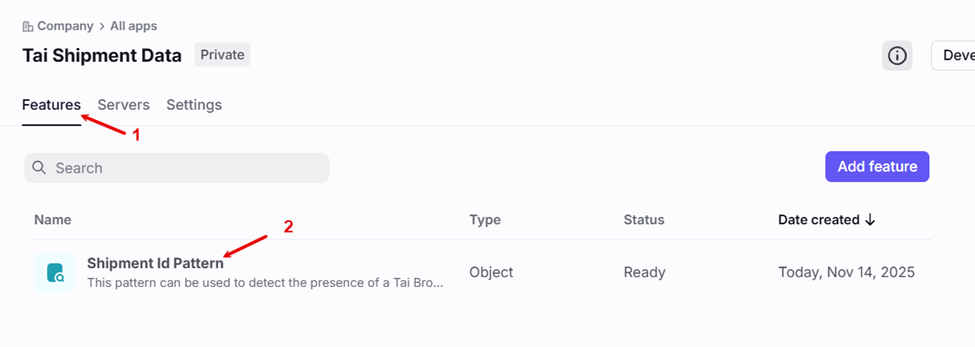
- Under the Features tab
- Click on the shipment ID pattern we created
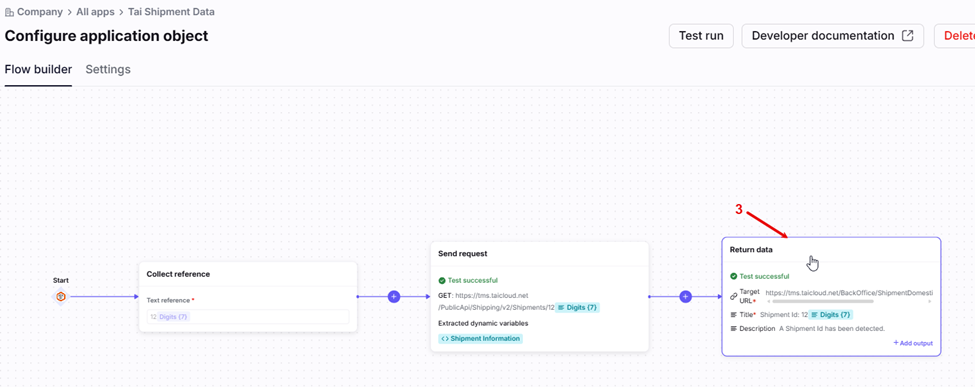
3. Then click on the “Return Data” Rectangle
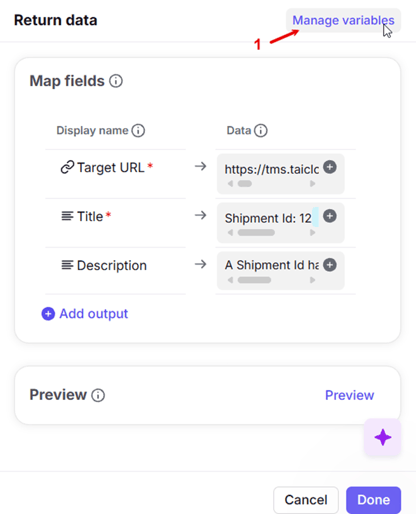
- Now click on “Manage Variables” option
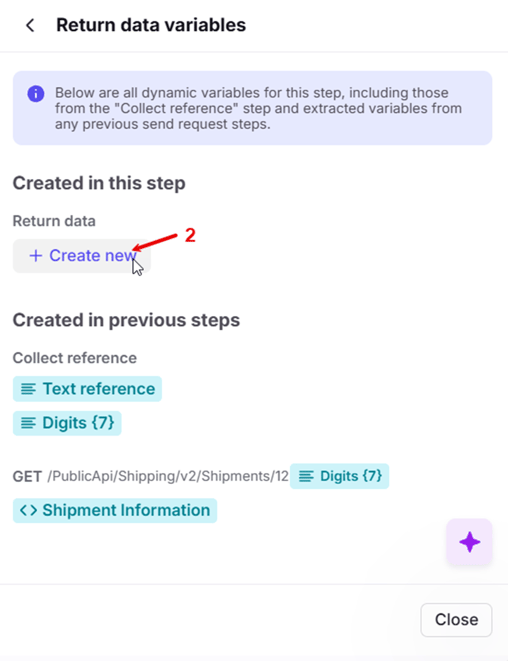
2. Then click on “Create new” option
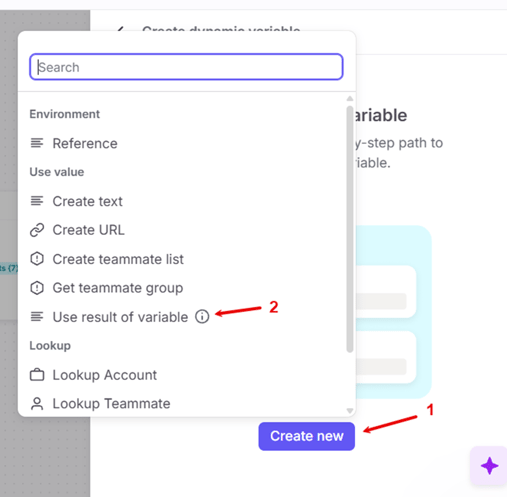
- In the modal that appears click on “Create New” button
- Then select the “Use result of variable” option
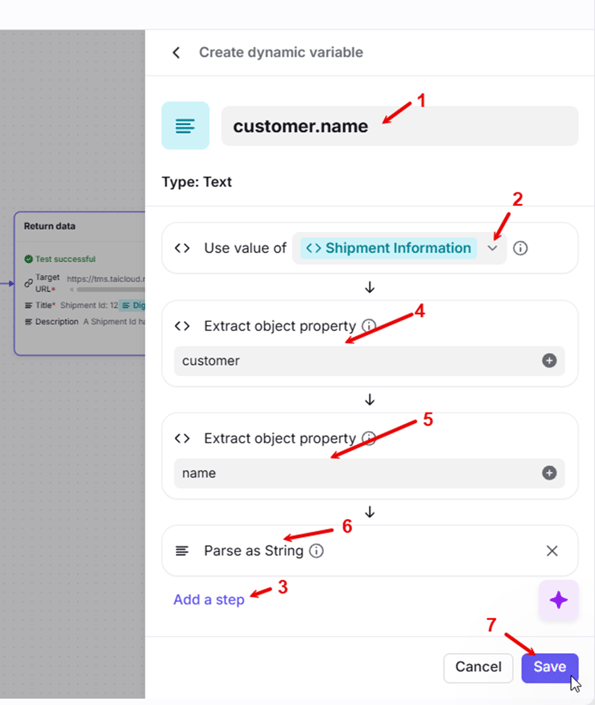
- Start by naming this variable. This time use "customer.name" because we are going to use this variable to get the customer name from the previous variable.
- In the "Use value of" input click the down arrow and choose our previous variable, "Shipment Information".
- Next, click "Add a step" to add the next 3 items.
- For the first item added choose "Extract object property" and enter a value of "customer". This is coming from the "customer" property of our Shipment Data response.
- For this second item added choose "Extract object property" and enter a value of "name". This is coming from the "name" property of the "customer" object that was chosen above.
- For the third item added choose "Parse as String".
- Last, click the blue "Save" button in the lower right corner to save this new variable.
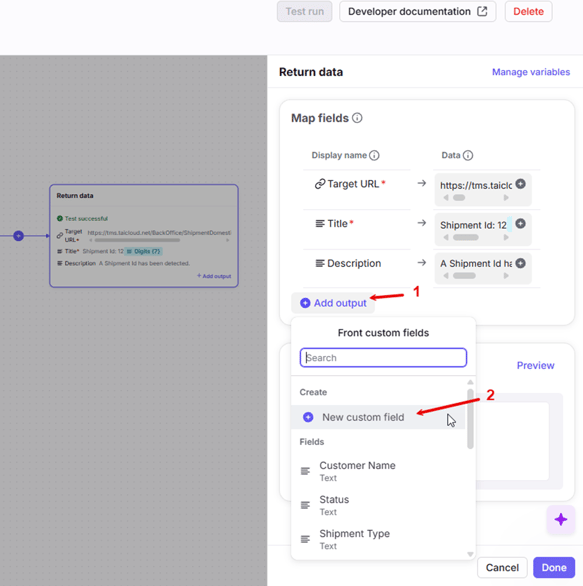
- Going back to the Return Data modal, click on “Add Output”
- If you are reusing a previously created output you can select it or in this case you can click "New custom field".
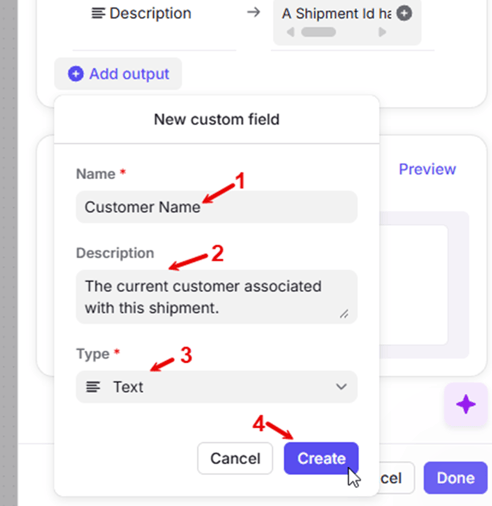
- In the "New custom field" modal add a name. We recommend using "Customer Name".
- Then add a short description. We used "The current customer associated with this shipment.".
- Choose the "Type" as "Text" since our variable is a text value.
- Click the blue "Create" button in the lower right corner to create it.
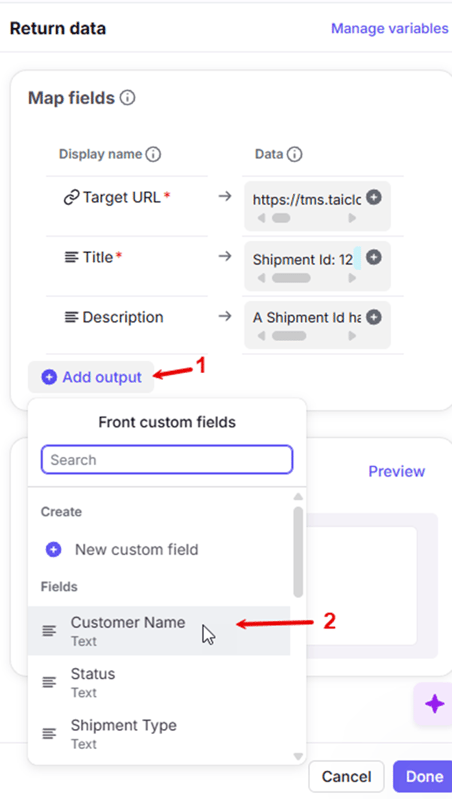
- If not automatically added after creating the custom field, click on Add output
- Select the Customer name option you created
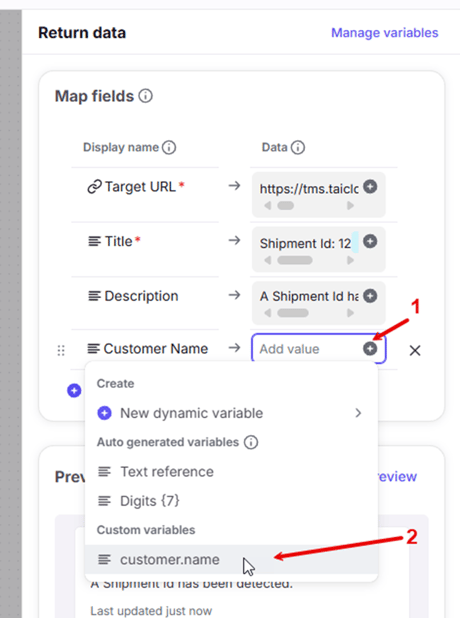
- Click on the + icon next to Customer name
- Select the custom variable customer.name
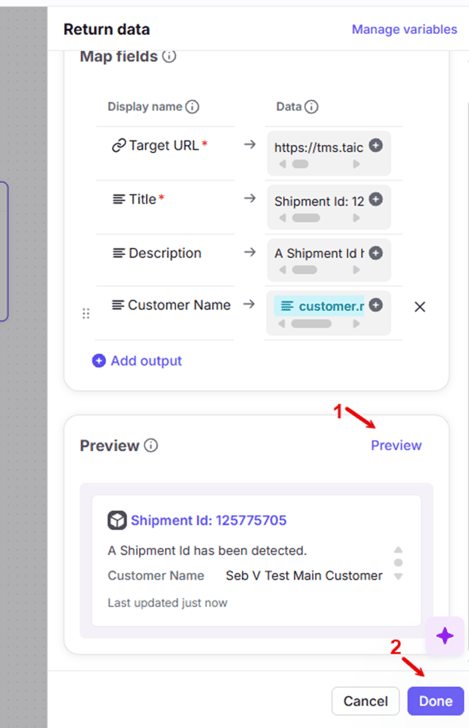
- You can click on preview to test how the customer name would display
- Click on the blue “Done” button to save the changes
- Click on the blue “Save” on the bottom right corner of the page to save all changes made.
You can continue this process of adding variables and outputs to your application object. Below are a few more examples of the variables configurations you can add using the steps above.
Shipment Type

Shipment Status

Carrier Name

Sample Payload Data
This is a sample payload of the data that will be available in the Front fetch request. You can add any of these properties to your Dynamic Object by creating new variables like the "status" example above.
{
  "shipmentId": 119121287,
  "mileage": 100,
  "customer": {
    "name": "Marine Solutions",
    "referenceNumber": "1233",
    "staffID": 92712,
    "staffName": "Front Office (Imp)",
    "salesRepNames": "Sales Rep",
    "billToOrganizationId": 54931,
    "officeOrganizationId": 53207,
    "officeName": "Implementation Demo"
  },
  "payerOrganization": {
    "organizationId": 54931,
    "name": "Marine Solutions",
    "address": {
      "streetAddress": "20 Triad S Dr",
      "city": "Saint Charles",
      "state": "MO",
      "zipCode": "63304",
      "country": "USA"
    }
  },
  "totalBuy": 285.6,
  "totalSell": 328.37,
  "status": "Quote",
  "carrierList": [
    {
      "carrierMasterId": 17840,
      "name": "ROADRUNNER TRANSPORTATION SERVICES INC",
      "scac": "RDFS",
      "dotNumber": "242009",
      "mcNumber": "170247",
      "trackingURL": "",
      "city": "MILWAUKEE",
      "state": "WI",
      "zipCode": "53224",
      "phoneNumber": "+14146151500",
      "tariffName": "BL - Implementation Demo - RDFS - API",
      "transitType": "Linehaul",
      "status": "Quote",
      "buy": 285.6,
      "sell": 328.37
    }
  ],
  "attachments": [],
  "shipmentType": "LTL",
  "stackable": false,
  "trailerType": "Van",
  "trailerSize": "Full",
  "weightUnits": "lbs",
  "dimensionUnits": "in",
  "serviceLevel": "Normal",
  "shipmentReferenceNumbers": [
    {
      "referenceType": "API Quote Number",
      "value": "8591216"
    },
    {
      "referenceType": "Customer Confirmation",
      "value": "False"
    },
    {
      "referenceType": "Carrier Confirmation",
      "value": "False"
    },
    {
      "referenceType": "Shipment Id",
      "value": "119121287"
    }
  ],
  "stops": [
    {
      "shipmentStopId": 32283923,
      "companyName": "Tai Software - St. Louis",
      "streetAddress": "4500 S Kingshighway Blvd",
      "streetAddressTwo": "",
      "city": "Saint Louis",
      "state": "MO",
      "zipCode": "63109",
      "country": "USA",
      "contactName": "",
      "phone": "",
      "email": "",
      "estimatedReadyDateTime": "2024-05-28T14:26:28-06:00",
      "estimatedCloseDateTime": "2024-05-28T14:26:28-06:00",
      "stopType": "First Pickup",
      "shipmentStopReferenceNumbers": []
    },
    {
      "shipmentStopId": 32283924,
      "companyName": "Tai Software",
      "streetAddress": "401 Main St",
      "streetAddressTwo": "Suite 201",
      "city": "Huntington Beach",
      "state": "CA",
      "zipCode": "92648",
      "country": "USA",
      "contactName": "",
      "phone": "",
      "email": "",
      "estimatedReadyDateTime": "2024-06-01T14:26:28-08:00",
      "estimatedCloseDateTime": "2024-05-28T00:00:00-08:00",
      "stopType": "Last Drop",
      "shipmentStopReferenceNumbers": []
    }
  ],
  "commodities": [
    {
      "handlingQuantity": 1,
      "packagingType": "Pallet",
      "length": 40,
      "width": 40,
      "height": 40,
      "weightTotal": 500,
      "hazardousMaterial": false,
      "piecesTotal": 1,
      "freightClass": "85",
      "description": "Widgets",
      "hazardClasses": []
    }
  ],
  "accessorialCodes": [
    {
      "code": "LFTD",
      "name": "Liftgate - Delivery"
    }
  ],
  "shipmentAlerts": [
    {
      "type": 226,
      "createdDate": "2024-05-28T14:26:51.14+00:00",
      "resolved": false
    },
    {
      "type": 108,
      "createdDate": "2024-05-28T14:26:52.5766667+00:00",
      "resolved": false
    }
  ]
}