FedEx REST API Transition Guide
This article aims to assist Tai users with upgrading their FedEx integration to their new REST API. Our current version of the FedEx tariff is scheduled to be deprecated on January 1st, 2026.
OVERVIEW
- Retrieve the new credentials. The credentials required will be:
- Rating Client ID
- Rating Secret ID
- Tracking Client ID (must not match the Rating Client ID)
- Tracking Secret ID (must not match the Rating Secret ID)
- Account Number
- Bill To Account Number
- Create a new FEDEX REST integration in the TMS.
- Create a new tariff attached to this newly created integration.
RETRIEVE NEW CREDENTIALS
The FedEx team has facilitated the following video and step-by-step guide explaining how to retrieve the new credentials needed for this integration.
Getting Started with FedEx APIs - Video
Getting Started with FedEx APIs - Guide
Note you will need to log in with your FedEx username and password to access the guide. You will also need to have your shipping account number ready to be added throughout the process.
The path to create the credentials will need to be conducted for two APIs, Rating and Tracking.

For Rating specifically, select the option called Freight LTL API:

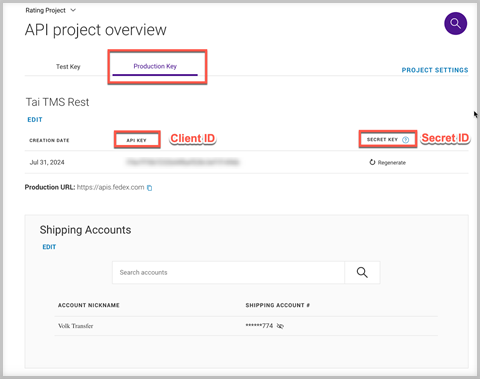
When concluded, generate the Production Key, and grab the Client ID and Secret ID as follows. You must do this for the Freight LTL API and the Tracking API.

FEDEX REST INTEGRATION
- From the TMS, go to Rates > Integration Sources > Add New Integration Source.
- Under the name field, enter the name you’d like the integration to have. You can name it following the tariff criteria, which is typically determined by the direction (blanket or customer-specific). An example would be ‘BL - Brokers' Name - FedEx REST’ or ‘CS - Brokers' Name - End Customer Name - FedEx REST.’
- Under Source Group, select Rating.
- Under Rating Type, select FEDEX REST.
- Under Username, enter the Freight LTL API Client ID.
- Under Password, enter the Freight LTL API Secret ID.
- Under Account Number, enter your FedEx Account Number.
- Save the integration.
- Once created, click on Edit Source.
- Enter the following information under Source Settings:
- paymentType = Sender, Recipient, Third Party → User S for Sender, R for Recipient, T for Third Party.
- bill to number = Bill To Account Number
- billTo.Lines (bill to address line) = Address
- billTo.city
- billTo.StateName
- billTo.postalCode
- billTo.country
- Direction = Consignee or shipper, Third Party → User C for Consignee, S for Shipper, T for Third Party.
- TrackingUsername: Tracking Client ID. (must not match the Rating Client ID)
- TrackingPassword: Tracking Secret ID. (must not match the Rating Secret ID)
The end result should look like this:

NEW TARIFF FOR THE INTEGRATION
- On the same integration source newly created for the FedEx REST integration, scroll down and click Add New Tariff.
- Name: Even though the name will be built automatically, enter a preliminary name to save the tariff. If the tariff is blanket for all customers, the name will start with a "BL," and if the tariff is customer-specific, it will start with a "CS." The name of the customer or the organization will follow, as will the carrier's SCAC.
- Carrier: FEDEX FREIGHT (FXFR)
- Mode: LTL.
- Effective Date/Expiration Date: The system will default to today's effective date and 20 years' expiration date.
- Service level: Normal.
- Status: Active.
- Pricing Instructions: Customize as needed.
- Tariff Sources: Select the newly created integration source if it is not populated automatically.
- Tariff Owner: Typically, it will be the accounting organization or the parent account, which is the company in charge of paying the carrier.
- Check the "Customer Specific" box if it needs to be linked to a particular customer. To complete this, a tariff link will also need to be added.
- Bill To Type: 1st or 3rd party collect and prepaid are the options.
- Bill To Address & Account Number: These will populate on the BOL and default to the tariff owner's organization address.
- Tariff Settings: Select if the tariff will be available for the front office, the rate requirements, and the lane's initial points. These can then be modified and adjusted on the tariff lane. For the time being, leave the lane point unchecked.
- Save the tariff.
- Click Import/Export CSV > Import Tariff. Follow the prompts and attach the following file:
- FedEx Tariff Lanes
- Download the file in Excel or CSV format. Either should work.
- Click Tariff Tools > Tariff Links and ensure the tariff is correctly linked to the organization or applicable customers.
You should be all set after following these steps. Try testing with a shipment, and if you see any issues, reach out to automation@tai-software.com.
FEDEX VOLUME INTEGRATION
If volume rating is also needed, the API key for PROD can be obtained from the Spot Quote Online Registration page: https://ecom-gateway-ws.freight.fedex.com/fxfSpotQuote/index.html