Table of Content
- Set Up
- Additional Source Settings
- How to Generate Money Codes
- How to Void Codes
Set Up
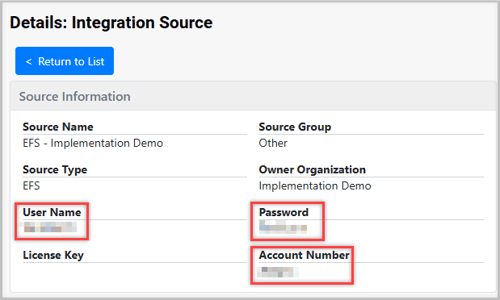
To create the integration with EFS, you will need to have a user, password, and contract ID from EFS.
Once you have obtained these details, proceed to set up an integration source for EFS by entering the following information:
- Username - EFS User
- Password - Password
- Account Number - Contract ID
Additional Source Settings
| Setting | Description | Default / Options |
|---|---|---|
| currency | Currency for transactions. | USD or CAD |
| lumperAmount | Default lumper amount applied to transactions. | 0 |
| advanceAmount | Default advance amount applied to transactions. | 0 |
| maximumAdvanceAmount |
The maximum allowable amount that can be issued for advance payments. |
None |
| bank | Bank account to be used for processing. Must match the GL Bank Account setup in Tai. | Required — must match existing GL bank account |
| ClientId | Auto-generated by Tai for the source. | Read-only |
| ExpirationDate | Auto-generated expiration date for the source. | Read-only |

Default Amounts
The Default Amount can be configured using the additional source settings: lumperAmount and advanceAmount. To do this, simply add a new source setting for either lumperAmount or advanceAmount and specify your preferred default amount. When you create a lumper or advance payment, the specified default amount will automatically populate in the payment creation process.
Note: This only sets the default value when creating Money Codes; however, you can still adjust the amounts before finalizing the issuance of a Money Code.
How to Generate Money Codes
When a shipment reaches the "Committed" status, you have the option to issue Money Codes through two methods: Lumper Payments and Advance Payments.
Lumper Payments
To generate a Money Code with a simple click, follow these steps:
- Open the shipment stop and click on the "Generate Payment Code" option.
- A Payment Code modal will appear
- Ensure that you select the appropriate Carrier from the available options.

- Once the Money Code is successfully issued, it will be displayed in the Payment Check Code stop reference numbers associated with the shipment stop.

Tip: The money Code can be found in the shipment's activity log. To send it directly to the carrier, simply click on the envelope icon within the activity log.

Note:
- Payments will be processed only after utilizing the Money Code.
- Money Codes can only be generated for shipment stops designated as "Drop" or "Both."
Advance Payments
To create a Money Code for Advance Payments, follow these steps:
- Open the $Accounting drop-down menu.
- Select "Advance Payment" for the corresponding Carrier for which the Money Code will be issued.
- For the Payment Type, select "EFS."
- Select the bank account and the amount for the advance payment.

Tip: The Money Code will be recorded in the shipment's Activity Log upon successful payment creation. To send the Money Code to the carrier, simply click on the envelope icon within the Activity Log.

How to Void Codes
This section outlines the steps for voiding Money Codes, which can be done for Lumper Payments and Advance Payments.
Lumper Payments
- First, open up the Shipment Stop where the Money Code was issued.
- Select the Delete Payment Code option.
Advance Payments
- First, go to the Bill Payment History tab under the Accounting tab.
- Locate the Bill Payment for the Vendor.
- Go into the Bill Payment Details.
- Select the option "Refund"

Note: This will attempt to void the Money Code. If the Money Code has been used, the Refund / Void process will fail.