Full List of Shipment Reference Numbers
|
Reference Number Name |
Description/Code |
|
AppointmentConfirmationNumber |
51 |
|
AssignedBranch |
1056 |
|
BoothNumber |
57 |
|
CancellationReason |
60 |
|
CarrierDispatcherEmail |
1041 |
|
CarrierDispatcherName |
46 |
|
CarrierDispatcherPhoneNumber |
47 |
|
CarrierRep |
50 |
|
ChargeLineType_Linehaul |
1015 |
|
ClaimNumber |
28 |
|
ContainerNumber |
24 |
|
ContainerSize |
39 |
|
CustomReferenceNumber |
26 |
|
CustomReferenceNumber2 |
27 |
|
CustomReferenceNumber3 |
1059 |
|
DeclaredValue |
1061 |
|
Decorator |
58 |
|
DeliveryCarrierProNumber |
22 |
|
DriverCellPhoneNumber |
11 |
|
DriverName |
30 |
|
EarliestReturn |
38 |
|
ExhibitorName |
56 |
|
FileNumber |
29 |
|
InsuranceDeclaredValue |
43 |
|
InvoiceNumber |
6 |
|
LastFreeDay |
37 |
|
LinehaulCarrierProNumber |
20 |
|
MAWBNumber |
23 |
|
MaxBuyRate |
1068 |
|
MinBuyRate |
1067 |
|
OfferRate |
1060 |
|
OnHoldReason |
1063 |
|
PaymentCheckCode |
1053 |
|
PaymentReferenceNumber |
40 |
|
PickupCarrierProNumber |
21 |
|
PONumber |
5 |
|
QualityIssue |
59 |
|
QuoteDueDate |
8 |
|
QuoteNumber |
7 |
|
ReferenceNumber |
1 |
|
RelayChargeId |
1055 |
|
RelayCodeId |
1054 |
|
ReleaseNumber |
4 |
|
SealNumber |
25 |
|
SecondaryBOLNumber |
15 |
|
SecondaryDriverCellPhoneNumber |
1058 |
|
SecondaryDriverName |
1057 |
|
ShipperReferenceNumber |
3 |
|
ShippingLine |
35 |
|
ShowName |
55 |
|
SteamshipLine |
33 |
|
Temperature |
32 |
|
TrackingReferenceNumber |
10 |
|
TrailerNumber |
9 |
|
TruckNumber |
31 |
|
VesselVoyage |
34 |
Accessing Reference Numbers - Customer Profile
-
Go to the Customer Company Profile.
-
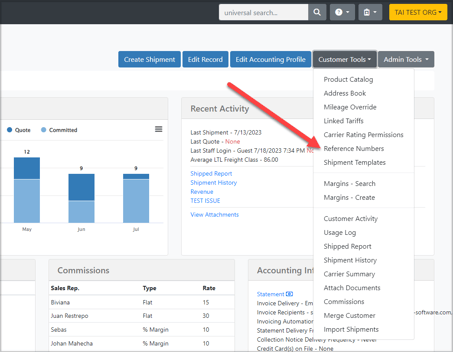
Click on the dropdown menu for Customer Tools.
-
Select Reference Numbers.
Accessing Reference Numbers - Organization
-
Go to the My Organization option under the LSP tab.
-
Click on the dropdown menu for BrokerTools.
-
Select Reference Numbers.

Note: If you add a reference number from the organization profile, it will be available to all customers. However, if you want a reference number specific to a customer, you can add it at the customer level.
Adding or Editing a Customer Reference Number
-
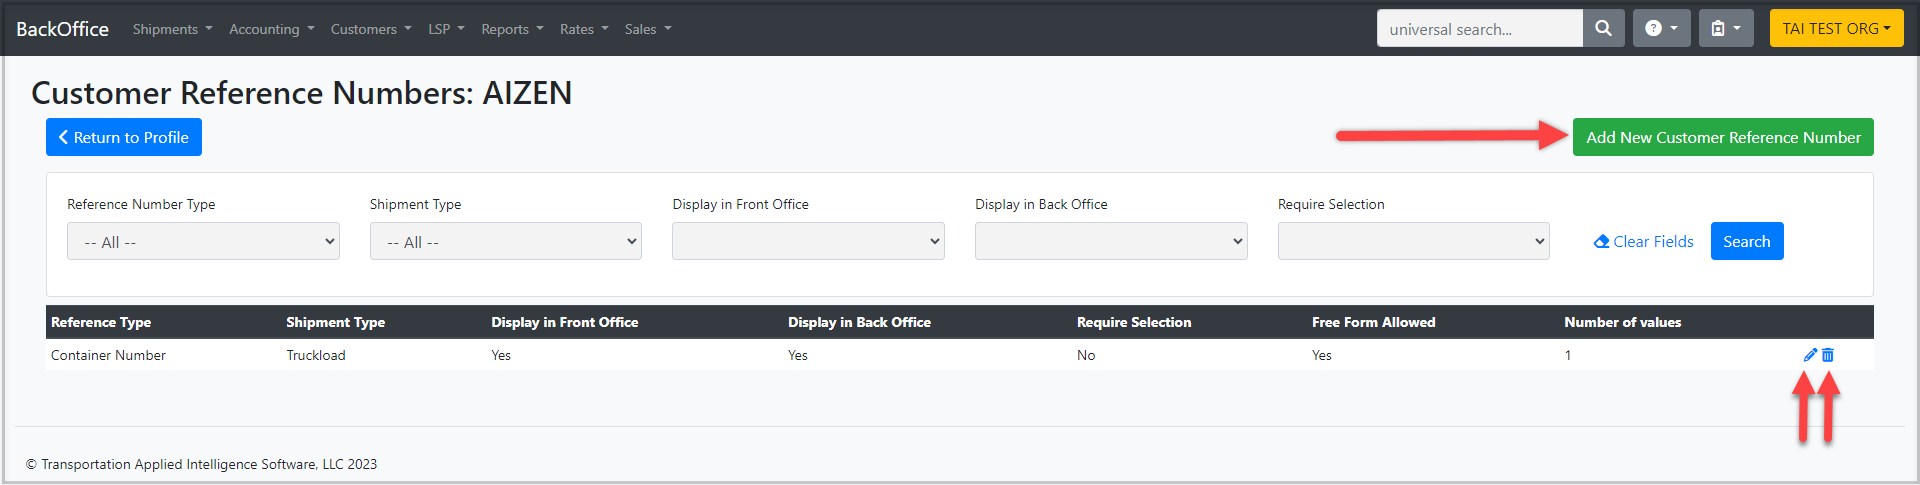
When you navigate to the Reference Numbers add/edit screen, the initial view will display a list of reference numbers you have already edited.
-
To make changes or remove an existing reference number, click on the blue pencil or trash can icons on the right side.
-
To create a new default or required reference number, click the green "Add New Customer Reference Number" button.
-
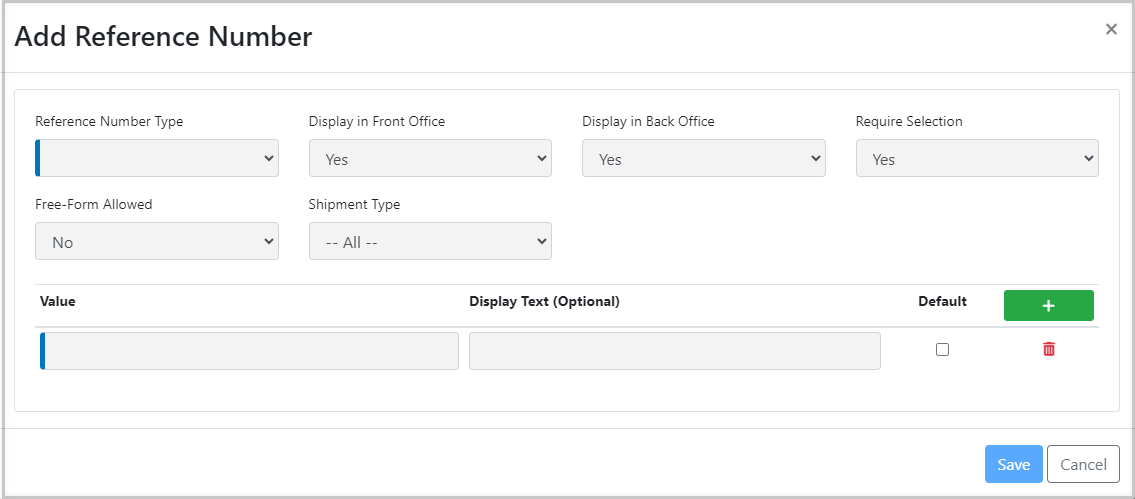
The Add Reference Number modal will pop up, allowing you to input the following settings:
-
-
Reference Number Type: In this section, you will find the reference numbers you can edit.
-
Display in Front Office: You can choose whether to enable this option as Yes or No based on whether you want this reference number to be accessible in the customer portal.
-
Display in Back Office: You can choose whether to enable this option as Yes or No based on whether you want this reference number accessible in your back office.
-
Require Selection: If set to Yes, this field will be highlighted in blue, indicating that users must input information in this field to save the shipment.
If set to No, the reference number will be set as a default option, but users have the choice to skip it.
-
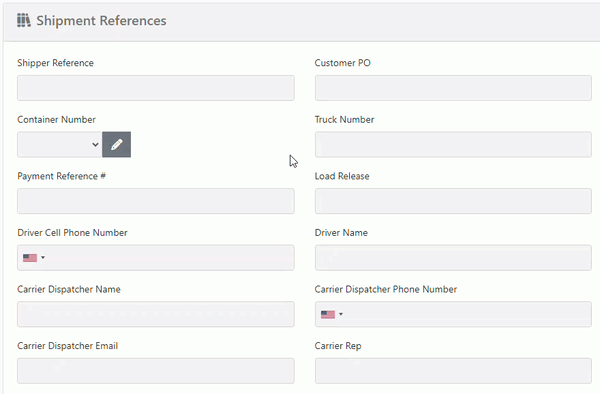
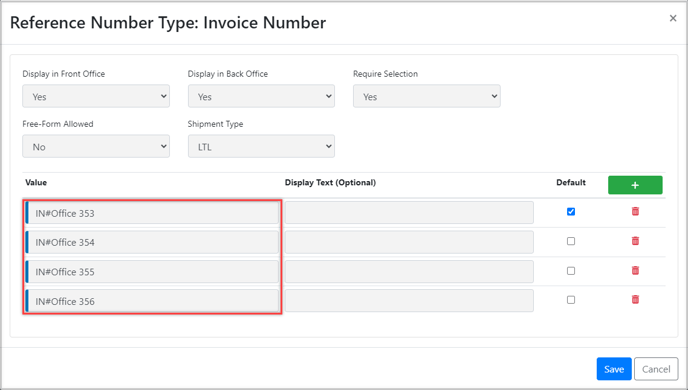
Free-Form Allowed: Users can manually enter text in the field if the option is set to Yes. To input information, click the Pencil Icon, as shown in Example 1.
-
Example 1
-
-
Value: This setting is linked to the "Free-Form Allowed" option. When the option is set to No, the value field will be required, indicating that you either want a pre-set option available on all shipments or you want to provide different options that will be displayed in a dropdown list, as shown in Example 2.
-
Example 2
-
- Plus Sign
 : This option allows you to include an additional item in the list of values that users can choose from when selecting a reference number.
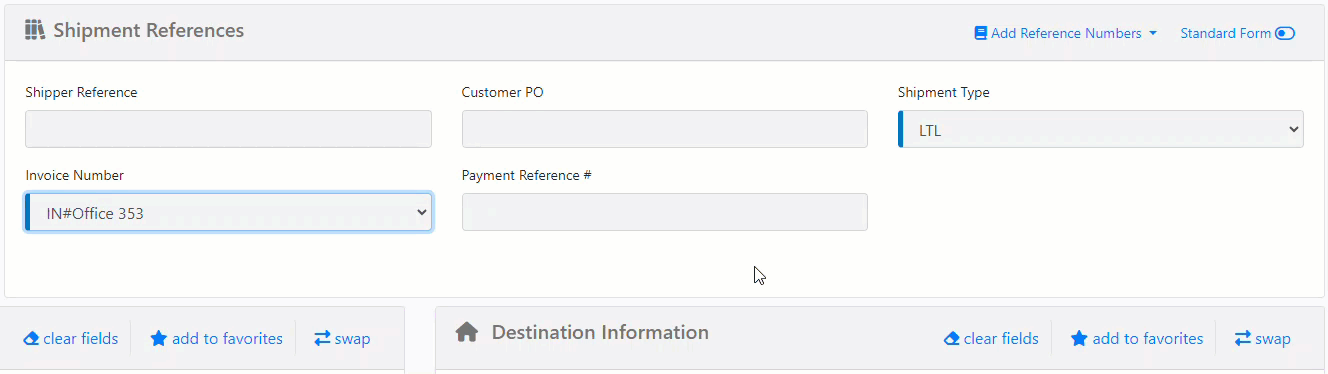
 - Default: When creating a shipment, the checkbox you select will determine the first value in the reference number field. Check Example 2.
- Remember to click Save when you're done!
- Plus Sign