QuickBooks Online Classes in Tai
This article provides a comprehensive overview of Tai’s new feature for integrating QuickBooks Online Classes with reference numbers from shipments. Note that this feature is only compatible with QuickBooks Online Plus or Advanced packages.
In Tai, users can transfer reference numbers associated with a shipment into QuickBooks Online, where these numbers will appear as Classes or reference numbers in accounting transactions. This integration helps streamline transaction tracking and organization within QBO.
Setting Up Classes in Tai
To enable and configure this feature, follow the steps below:
Step 1: Turn On QuickBooks Online Integration
- Create the Integration: Quick Books Online in the Organization.
- Confirm that this integration has been added at the Parent level.
Step 2: Configure Organization Link and Class Settings
- Organization Link: Ensure the Organization Link is set up.
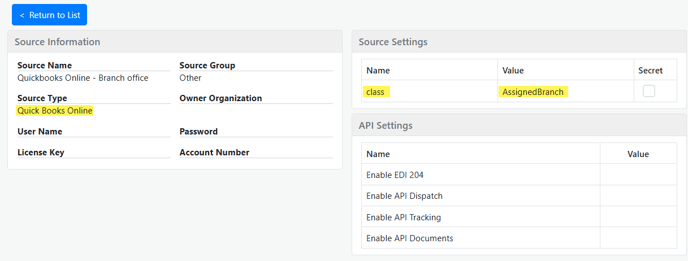
- Enable Class Setting: Add the "class" setting to transfer reference numbers.
- Specify Reference Numbers: Add the specific reference numbers you wish to include, such as:
FileNumberCustomReferenceNumber
Note: Avoid using spaces in reference numbers.

How the Class Function Works in Tai
Once set up, the class will be added to relevant QBO transactions, such as Invoices and Bills. Here’s how the system handles Classes:
- If a Matching Reference Number Exists: The Class will be added to the transaction automatically.
- If No Matching Reference Number is Found: A new Class is created.
- If No Class is Entered in the Reference Number Field: The system will follow the default workflow, where no Class is assigned.
Tip: You may want to create a dropdown for specific classes to enable easy reference number selection by users.
Related Articles
For additional information on managing Classes in QuickBooks Online, refer to QuickBooks Online Class Management.